想来用了这么久的Spring Boot,但一直没仔细了解它是怎么启动的。那既然想起来了,不如趁热打铁,从它的入口开始,深入看看Spring Boot在启动时都做了些什么。
启动入口 入口这部分就没啥说的,跟个Hello world差不多,一个main方法执行SpringApplication#run来启动整个Spring Boot应用。
1
2
3
4
5
6
@SpringBootApplication public class DemoApplication { public static void main (String[] args) { SpringApplication.run(DemoApplication.class, args); } }
@SpringBootApplication注解 进到@SpringBootApplication注解的源码可以看出,它实际上是@SpringBootConfiguration、@EnableAutoConfiguration和@ComponentScan的组合。
1
2
3
4
5
6
7
8
9
10
11
12
13
@Target(ElementType.TYPE) @Retention(RetentionPolicy.RUNTIME) @Documented @Inherited @SpringBootConfiguration @EnableAutoConfiguration @ComponentScan(excludeFilters = { @Filter(type = FilterType.CUSTOM, classes = TypeExcludeFilter.class), @Filter(type = FilterType.CUSTOM, classes = AutoConfigurationExcludeFilter.class) }) public @interface SpringBootApplication { }
@SpringBootConfiguration注解 @SpringBootConfiguration注解实际上只是@Configuration注解的套娃,区别只有两点:
@SpringBootConfiguration是Spring Boot提供的注解,而@Configuration是Spring提供的注解;@SpringBootConfiguration注解在整个应用中只能出现一次,@Configuration注解则可以需要有多少就用多少次。
1
2
3
4
5
6
7
8
@Target(ElementType.TYPE) @Retention(RetentionPolicy.RUNTIME) @Documented @Configuration @Indexed public @interface SpringBootConfiguration { }
@EnableAutoConfiguration注解 @EnableAutoConfiguration注解通过引入AutoConfigurationImportSelector来开启Spring Boot的自动配置功能。这部分内容我在另一篇博文Spring Boot 自动配置的原理 中有详细的说明,这里就不再重复了。
@ComponentScan注解 @ComponentScan注解用来配置Spring如何扫描组件。我们可以通过设定basePackageClasses或basePackages属性来指定从哪些包中扫描,而在不指定的情况下,Spring就会从带有这个注解的类所在的包开始扫描。
因为这个注解会在启动类中被引入,而启动类又在项目最顶层的包中(应该没有谁闲的会去挪启动类的位置吧),所以Spring就会从顶层包开始往下扫描组件。
SpringApplication类 从启动类对SpringApplication#run的调用一路追下去,最后会走到SpringApplication类的这个代码块:
1
2
3
public static ConfigurableApplicationContext run (Class<?>[] primarySources, String[] args) { return new SpringApplication (primarySources).run(args); }
SpringApplication的构造方法 可以看到这里先实例化了一个SpringApplication对象,那么顺着对应的构造方法一路追下去,最后会看到这样一个构造方法:
1
2
3
4
5
6
7
8
9
10
11
12
13
14
15
16
public SpringApplication (ResourceLoader resourceLoader, Class<?>... primarySources) { this .resourceLoader = resourceLoader; Assert.notNull(primarySources, "PrimarySources must not be null" ); this .primarySources = new LinkedHashSet <>(Arrays.asList(primarySources)); this .webApplicationType = WebApplicationType.deduceFromClasspath(); this .bootstrapRegistryInitializers = new ArrayList <>( getSpringFactoriesInstances(BootstrapRegistryInitializer.class)); setInitializers((Collection) getSpringFactoriesInstances(ApplicationContextInitializer.class)); setListeners((Collection) getSpringFactoriesInstances(ApplicationListener.class)); this .mainApplicationClass = deduceMainApplicationClass(); }
判断应用程序的类型 Spring Boot需要判断应用是哪种类型,来决定要不要启动它内嵌的web server,以及启动哪种web server。它会根据这样一个规则来判断当前应用的类型:
如果能找到org.springframework.web.reactive.DispatcherHandler类,同时找不到org.springframework.web.servlet.DispatcherServlet和org.glassfish.jersey.servlet.ServletContainer,那么就判定当前应用是一个reactive web应用,并会在将来启动面向reactive的web server;
如果org.springframework.web.servlet.DispatcherServlet和org.glassfish.jersey.servlet.ServletContainer都找不到,说明这个应用不是一个web application,将来也不会启动任何web server;
如果以上条件都不符合,那么就判定这个应用是一个servlet web应用,将来会启动面向servlet的web server。
实例化initializer和listener 点进getSpringFactoriesInstances方法的实现并顺着追下去,最终可以看到这样一个代码块:
1
2
3
private <T> List<T> getSpringFactoriesInstances (Class<T> type, ArgumentResolver argumentResolver) { return SpringFactoriesLoader.forDefaultResourceLocation(getClassLoader()).load(type, argumentResolver); }
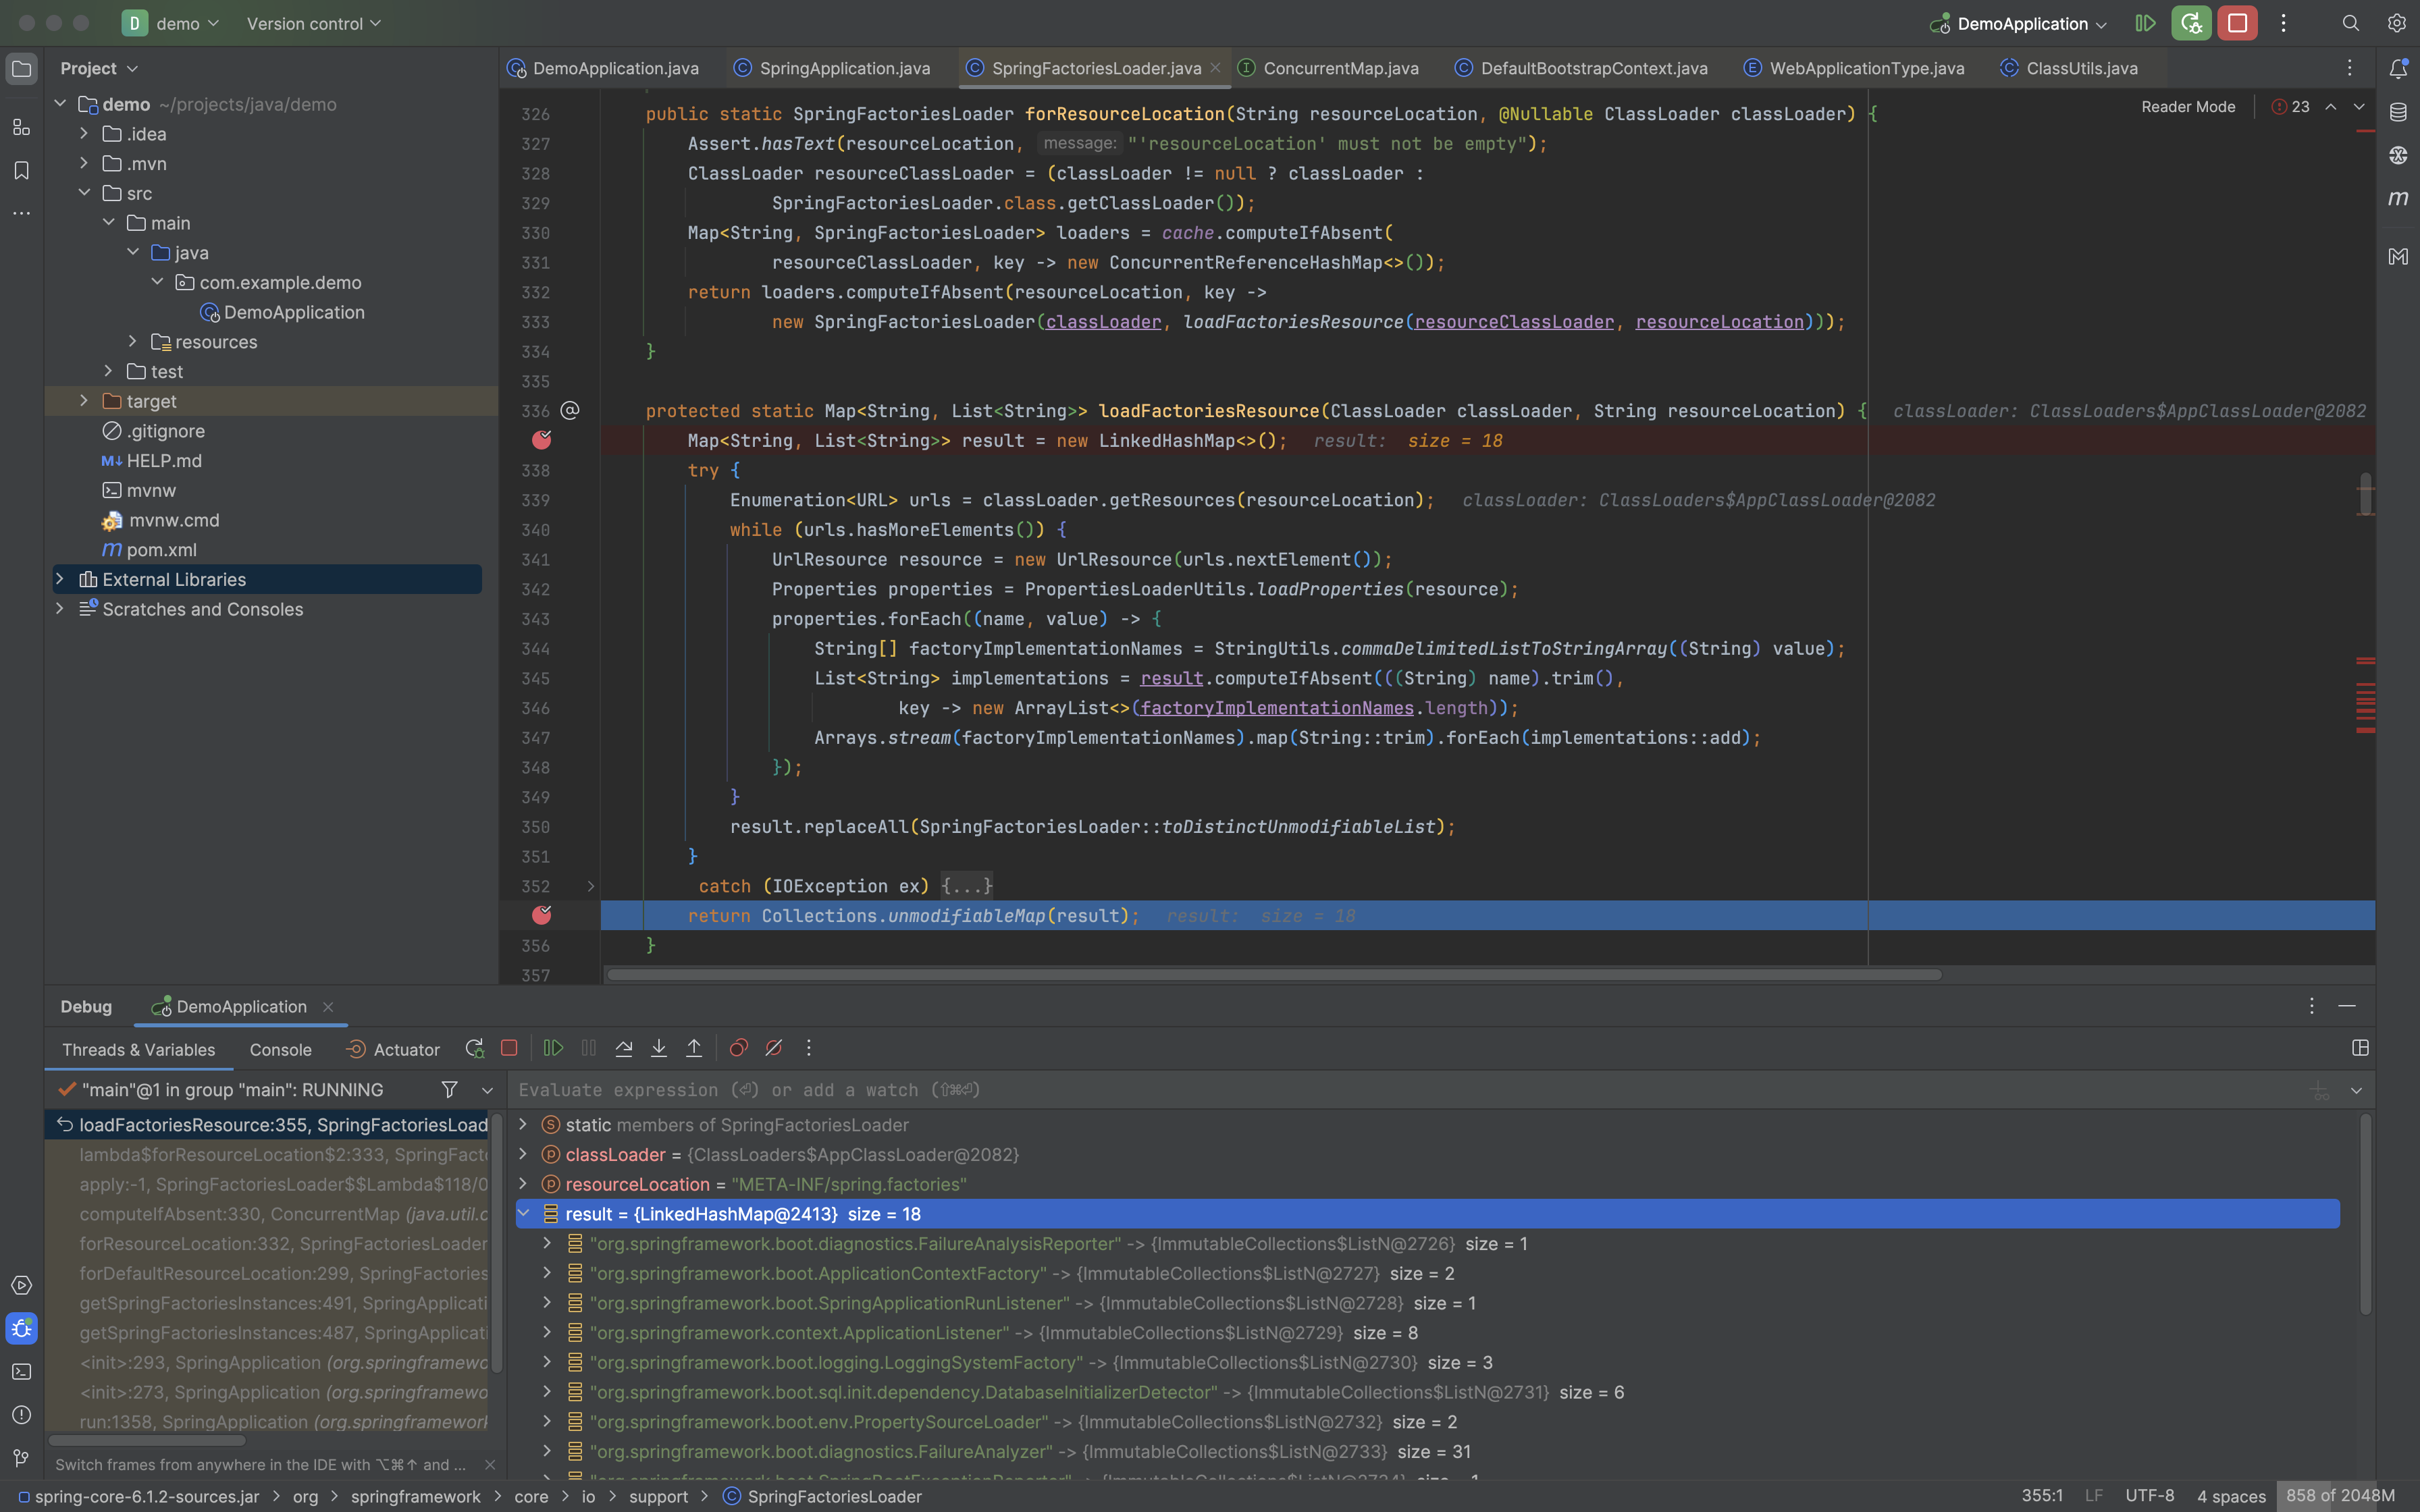
再顺着forDefaultResourceLocation方法的实现,最终会走到这里:
1
2
3
4
5
6
7
8
9
public static SpringFactoriesLoader forResourceLocation (String resourceLocation, @Nullable ClassLoader classLoader) { Assert.hasText(resourceLocation, "'resourceLocation' must not be empty" ); ClassLoader resourceClassLoader = (classLoader != null ? classLoader : SpringFactoriesLoader.class.getClassLoader()); Map<String, SpringFactoriesLoader> loaders = cache.computeIfAbsent( resourceClassLoader, key -> new ConcurrentReferenceHashMap <>()); return loaders.computeIfAbsent(resourceLocation, key -> new SpringFactoriesLoader (classLoader, loadFactoriesResource(resourceClassLoader, resourceLocation))); }
看起来好像云里雾里的,下断点调试一下看出来了,这里就是扫描所有META-INF目录下的spring.factories文件,并把里面所有的键值对放到一个Map里。最后我们可以得到一个包含了这个Map的SpringFactoriesLoader对象。
接着看load方法,顺着追下去会走到这个代码块:
1
2
3
4
5
6
7
8
9
10
11
12
13
14
15
16
17
public <T> List<T> load (Class<T> factoryType, @Nullable ArgumentResolver argumentResolver, @Nullable FailureHandler failureHandler) { Assert.notNull(factoryType, "'factoryType' must not be null" ); List<String> implementationNames = loadFactoryNames(factoryType); logger.trace(LogMessage.format("Loaded [%s] names: %s" , factoryType.getName(), implementationNames)); List<T> result = new ArrayList <>(implementationNames.size()); FailureHandler failureHandlerToUse = (failureHandler != null ) ? failureHandler : THROWING_FAILURE_HANDLER; for (String implementationName : implementationNames) { T factory = instantiateFactory(implementationName, factoryType, argumentResolver, failureHandlerToUse); if (factory != null ) { result.add(factory); } } AnnotationAwareOrderComparator.sort(result); return result; }
这里就是从上面得到的Map中找到factoryType传进来的接口对应的实现类,分别调用它们的构造方法将其实例化,然后把得到的对象放在List里面返回,并交给外层的setInitializers方法来把这个List放在SpringApplication类的成员变量initializers中。
实例化listener也是一样的流程。至于ApplicationListener则是Spring的事件监听器,利用观察者模式,通过ApplicationEvent和ApplicationListener接口实现对Spring容器全生命周期的监听,同时也可以监听自定义的事件。
找到主类 顺着deduceMainApplicationClass的实现,会注意到这么两个方法:
1
2
3
4
5
6
7
8
9
10
11
private Class<?> deduceMainApplicationClass() { return StackWalker.getInstance(StackWalker.Option.RETAIN_CLASS_REFERENCE) .walk(this ::findMainClass) .orElse(null ); } private Optional<Class<?>> findMainClass(Stream<StackFrame> stack) { return stack.filter((frame) -> Objects.equals(frame.getMethodName(), "main" )) .findFirst() .map(StackWalker.StackFrame::getDeclaringClass); }
看起来挺简单粗暴的,就是遍历栈帧,找执行了main方法的那个栈,然后找到这个栈对应的类。
run方法 经过上面一顿操作,这个SpringApplication对象就初始化好了,接下来就会调用它的run方法开始启动。
1
2
3
4
5
6
7
8
9
10
11
12
13
14
15
16
17
18
19
20
21
22
23
24
25
26
27
28
29
30
31
32
33
34
35
36
37
38
39
40
41
42
43
44
45
46
public ConfigurableApplicationContext run (String... args) { Startup startup = Startup.create(); if (this .registerShutdownHook) { SpringApplication.shutdownHook.enableShutdownHookAddition(); } DefaultBootstrapContext bootstrapContext = createBootstrapContext(); ConfigurableApplicationContext context = null ; configureHeadlessProperty(); SpringApplicationRunListeners listeners = getRunListeners(args); listeners.starting(bootstrapContext, this .mainApplicationClass); try { ApplicationArguments applicationArguments = new DefaultApplicationArguments (args); ConfigurableEnvironment environment = prepareEnvironment(listeners, bootstrapContext, applicationArguments); Banner printedBanner = printBanner(environment); context = createApplicationContext(); context.setApplicationStartup(this .applicationStartup); prepareContext(bootstrapContext, context, environment, listeners, applicationArguments, printedBanner); refreshContext(context); afterRefresh(context, applicationArguments); startup.started(); if (this .logStartupInfo) { new StartupInfoLogger (this .mainApplicationClass).logStarted(getApplicationLog(), startup); } listeners.started(context, startup.timeTakenToStarted()); callRunners(context, applicationArguments); } catch (Throwable ex) { } try { if (context.isRunning()) { listeners.ready(context, startup.ready()); } } catch (Throwable ex) { } return context; }
创建bootstrap context 点进createBootstrapContext方法,可以看到这样一个代码块:
1
2
3
4
5
private DefaultBootstrapContext createBootstrapContext () { DefaultBootstrapContext bootstrapContext = new DefaultBootstrapContext (); this .bootstrapRegistryInitializers.forEach((initializer) -> initializer.initialize(bootstrapContext)); return bootstrapContext; }
在构造SpringApplication时准备的this.bootstrapRegistryInitializers在这用上了。看代码的话就是分别执行每个initializer的initailize方法。但是我这个应用里面没有BootstrapRegistryInitializer的实现类,所以也就没法深入进去看它到底干了什么。
不过看了眼Git Blame ,发现了这么一段话:
Refactor BootstrapRegistry support following initial prototype work with the Spring Cloud team.
看起来是跟Spring Cloud相关的,那暂且就不关注了。
进入无头模式 在Oracle的文档Using Headless Mode in the Java SE Platform 中提到
Headless mode is a system configuration in which the display device, keyboard, or mouse is lacking. Sounds unexpected, but actually you can perform different operations in this mode, even with graphic data.
Where it is applicable? Let’s say that your application repeatedly generates a certain image, for example, a graphical authorization code that must be changed every time a user logs in to the system. When creating an image, your application needs neither the display nor the keyboard. Let’s assume now that you have a mainframe or dedicated server on your project that has no display device, keyboard, or mouse. The ideal decision is to use this environment’s substantial computing power for the visual as well as the nonvisual features. An image that was generated in the headless mode system then can be passed to the headful system for further rendering.
其实就是,像web服务之类不需要显示界面的应用,就可以让它进入无头模式,让它在没有显示器等输入输出设备时也能启动,还可以提高计算效率。
启动listener 点进getRunListeners的实现可以看到如下代码块:
1
2
3
4
5
6
7
8
9
10
11
12
13
private SpringApplicationRunListeners getRunListeners (String[] args) { ArgumentResolver argumentResolver = ArgumentResolver.of(SpringApplication.class, this ); argumentResolver = argumentResolver.and(String[].class, args); List<SpringApplicationRunListener> listeners = getSpringFactoriesInstances(SpringApplicationRunListener.class, argumentResolver); SpringApplicationHook hook = applicationHook.get(); SpringApplicationRunListener hookListener = (hook != null ) ? hook.getRunListener(this ) : null ; if (hookListener != null ) { listeners = new ArrayList <>(listeners); listeners.add(hookListener); } return new SpringApplicationRunListeners (logger, listeners, this .applicationStartup); }
看到getSpringFactoriesInstances有没有感觉很熟悉?对,这一步就是尝试从spring.factories里尝试找到SpringApplicationRunListener的实现类。默认来说这里只能找到EventPublishingRunListener,它是用来发布各种SpringBootEvent的。在Spring Boot中,事件是一个很重要的东西,通过事件机制我们可以监听Spring Boot容器中正在发生的事件,也可以监听各种自定义的事件。事件机制也为Bean之间的消息传递提供支持。
除了从spring.factories尝试获取listener之外,Spring Boot也会尝试从SpringApplicationHook中找到hook进来的listener。看了下代码,似乎我们可以在入口的main方法里调用SpringApplication#withHook来添加我们需要的hook,但是我的应用里面也没有什么能用的,所以也没法深挖了。
在得到这些listener之后,就会实例化一个SpringApplicationRunListeners对象并返回回去,然后在SpringApplicationRunListeners#starting方法中调用各个listener的starting方法。此时,上面得到的EventPublishingRunListener就会广播出去一条ApplicationStartingEvent事件。
1
2
3
4
5
6
7
8
9
10
11
12
13
14
15
16
17
18
void starting (ConfigurableBootstrapContext bootstrapContext, Class<?> mainApplicationClass) { doWithListeners("spring.boot.application.starting" , (listener) -> listener.starting(bootstrapContext), (step) -> { if (mainApplicationClass != null ) { step.tag("mainApplicationClass" , mainApplicationClass.getName()); } }); } private void doWithListeners (String stepName, Consumer<SpringApplicationRunListener> listenerAction, Consumer<StartupStep> stepAction) { StartupStep step = this .applicationStartup.start(stepName); this .listeners.forEach(listenerAction); if (stepAction != null ) { stepAction.accept(step); } step.end(); }
准备环境 Spring中的Environment负责两件事:
加载配置好的各种property的值
后续通过各种方法获取property的值
在Spring Boot里,property的值可以通过YAML文件或properties文件、环境变量,和命令行参数这三种方法配置。此外,Spring Boot会依照一定的优先级来决定采用哪个property值,高优先级的会覆盖低优先级的。常见的几种配置方式会按照如下的优先级排列:
开发者工具Devtools全局配置
命令行指定的参数(如--server.port=8080)
JNDI参数
Java系统参数(通过-D指定的参数)
系统环境变量
对应不同环境的application-{profile}.yml配置文件
application.yml配置文件默认参数
点进prepareEvent方法的实现,可以看到这个代码块(我稍微重新格式化了一下,看起来更舒服一点):
1
2
3
4
5
6
7
8
9
10
11
12
13
14
15
16
17
18
19
20
21
22
23
24
25
26
27
28
29
30
31
32
33
private ConfigurableEnvironment prepareEnvironment ( SpringApplicationRunListeners listeners, DefaultBootstrapContext bootstrapContext, ApplicationArguments applicationArguments ) { ConfigurableEnvironment environment = getOrCreateEnvironment(); configureEnvironment(environment, applicationArguments.getSourceArgs()); ConfigurationPropertySources.attach(environment); listeners.environmentPrepared(bootstrapContext, environment); DefaultPropertiesPropertySource.moveToEnd(environment); Assert.state(!environment.containsProperty("spring.main.environment-prefix" ), "Environment prefix cannot be set via properties." ); bindToSpringApplication(environment); if (!this .isCustomEnvironment) { EnvironmentConverter environmentConverter = new EnvironmentConverter (getClassLoader()); environment = environmentConverter.convertEnvironmentIfNecessary(environment, deduceEnvironmentClass()); } ConfigurationPropertySources.attach(environment); return environment; } private ConfigurableEnvironment getOrCreateEnvironment () { if (this .environment != null ) { return this .environment; } ConfigurableEnvironment environment = this .applicationContextFactory.createEnvironment(this .webApplicationType); if (environment == null && this .applicationContextFactory != ApplicationContextFactory.DEFAULT) { environment = ApplicationContextFactory.DEFAULT.createEnvironment(this .webApplicationType); } return (environment != null ) ? environment : new ApplicationEnvironment (); }
首先在getOrCreateEnvironment中,Spring Boot会根据应用类型(reactive、servlet或none)来创建对应的环境。比如我这个是一个servlet应用,那么createEnvironment方法就会返回一个ApplicationServletEnvironment对象,并返回回去。
接下来到configureEnvironment里面:
1
2
3
4
5
6
7
8
9
10
11
12
13
14
15
16
17
18
19
20
21
22
23
24
25
26
27
28
29
30
31
32
33
34
protected void configureEnvironment (ConfigurableEnvironment environment, String[] args) { if (this .addConversionService) { environment.setConversionService(new ApplicationConversionService ()); } configurePropertySources(environment, args); configureProfiles(environment, args); } protected void configurePropertySources (ConfigurableEnvironment environment, String[] args) { MutablePropertySources sources = environment.getPropertySources(); if (!CollectionUtils.isEmpty(this .defaultProperties)) { DefaultPropertiesPropertySource.addOrMerge(this .defaultProperties, sources); } if (this .addCommandLineProperties && args.length > 0 ) { String name = CommandLinePropertySource.COMMAND_LINE_PROPERTY_SOURCE_NAME; if (sources.contains(name)) { PropertySource<?> source = sources.get(name); CompositePropertySource composite = new CompositePropertySource (name); composite.addPropertySource(new SimpleCommandLinePropertySource ("springApplicationCommandLineArgs" , args)); composite.addPropertySource(source); sources.replace(name, composite); } else { sources.addFirst(new SimpleCommandLinePropertySource (args)); } } } protected void configureProfiles (ConfigurableEnvironment environment, String[] args) {}
这个conversion service是干啥用的暂时还没搞明白,先留个坑,专注于主线。爬了些文大概看明白了,ConversionService是用来处理各种类型转换的,比如把字符串转换成Long或者日期等。
这里的话就是把各种参数(比如附加在启动命令里面的命令行参数)给填充到environment对象里。MutablePropertySources就是存放property的载体,在前面调用createEnvironment的时候,ApplicationServletEnvironment继承的AbstractEnvironment类的构造方法就会创建一个新的MutablePropertySources实例。
接下来ConfigurationPropertySources#attach方法里面,environment的propertySources会被封装成一个ConfigurationPropertySource并添加到environment中。
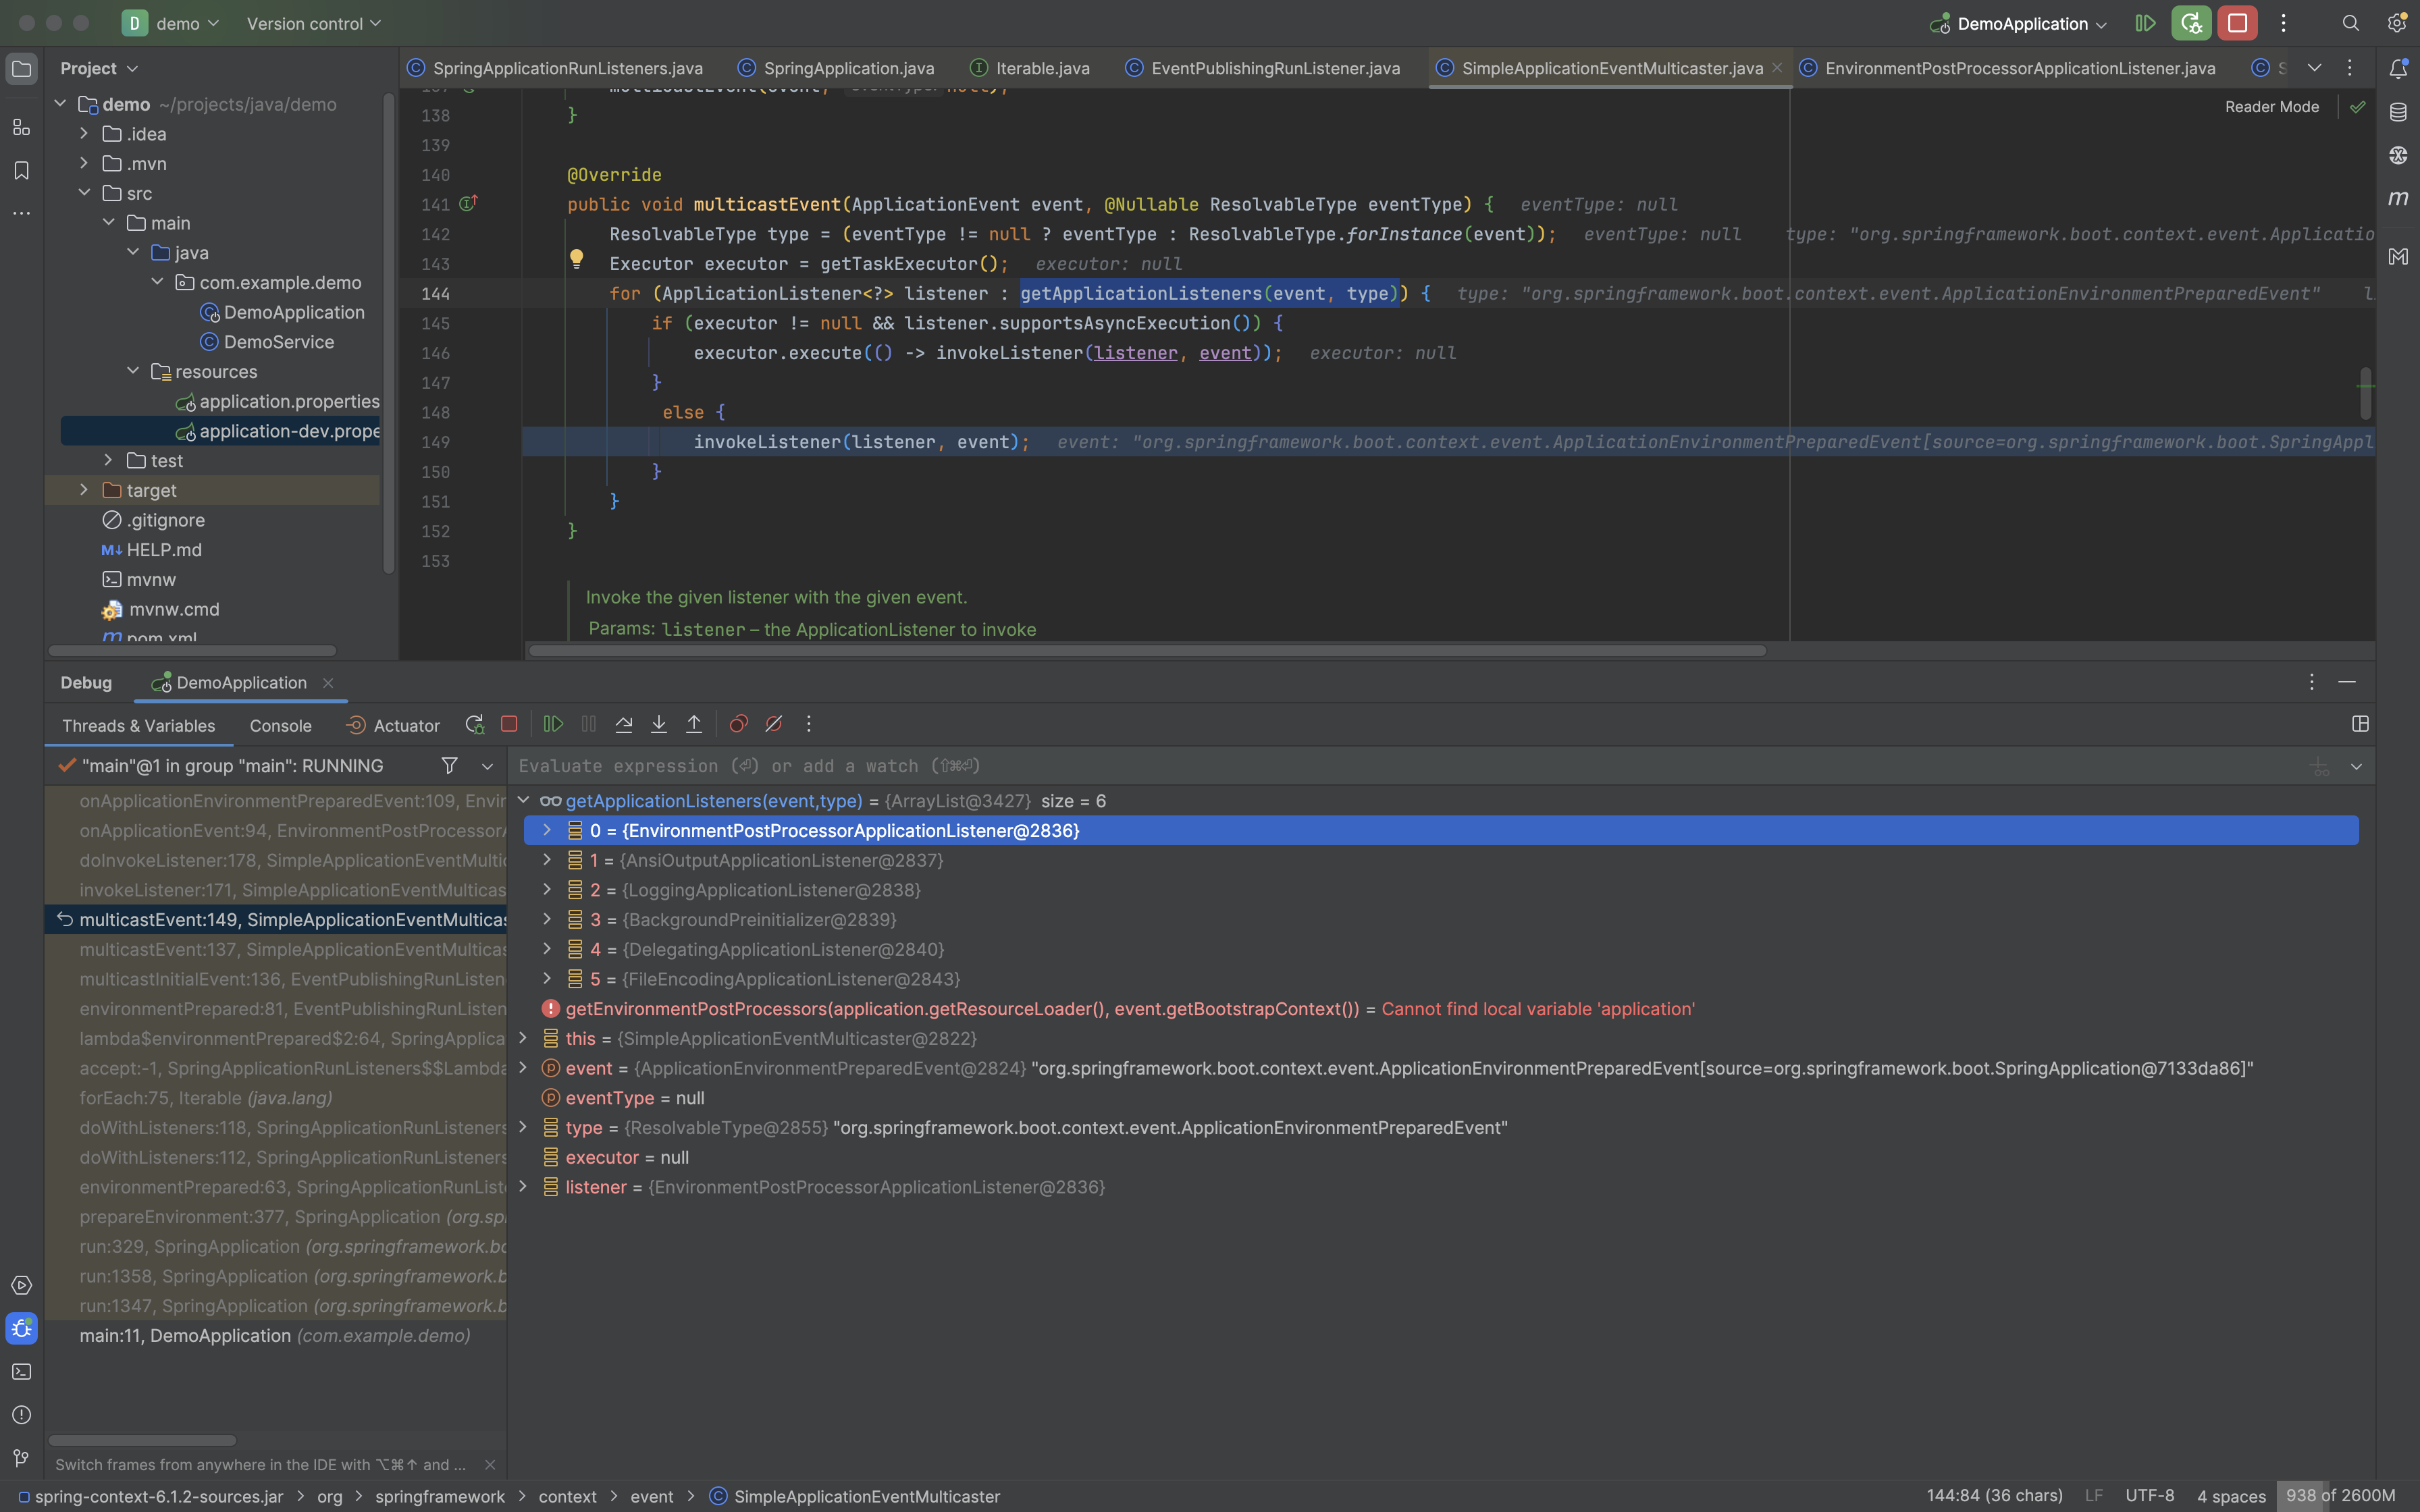
环境准备完成后,Spring Boot会发布一个ApplicationEnvironmentPreparedEvent事件。顺着doWithListeners方法一路追下去,在SimpleApplicationEventMulticaster#multicastEvent方法中,查看getApplicationListeners(event, type)的返回结果可以看到,这里会调用多个监听器来处理这个事件。
其中EnvironmentPostProcessorApplicationListener又会调用多个后处理器实现加载系统环境变量(由SystemEnvironmentPropertySourceEnvironmentPostProcessor完成)、在环境中设定启用的profile并把配置文件加载到环境(由ConfigDataEnvironmentPostProcessor完成)等操作。
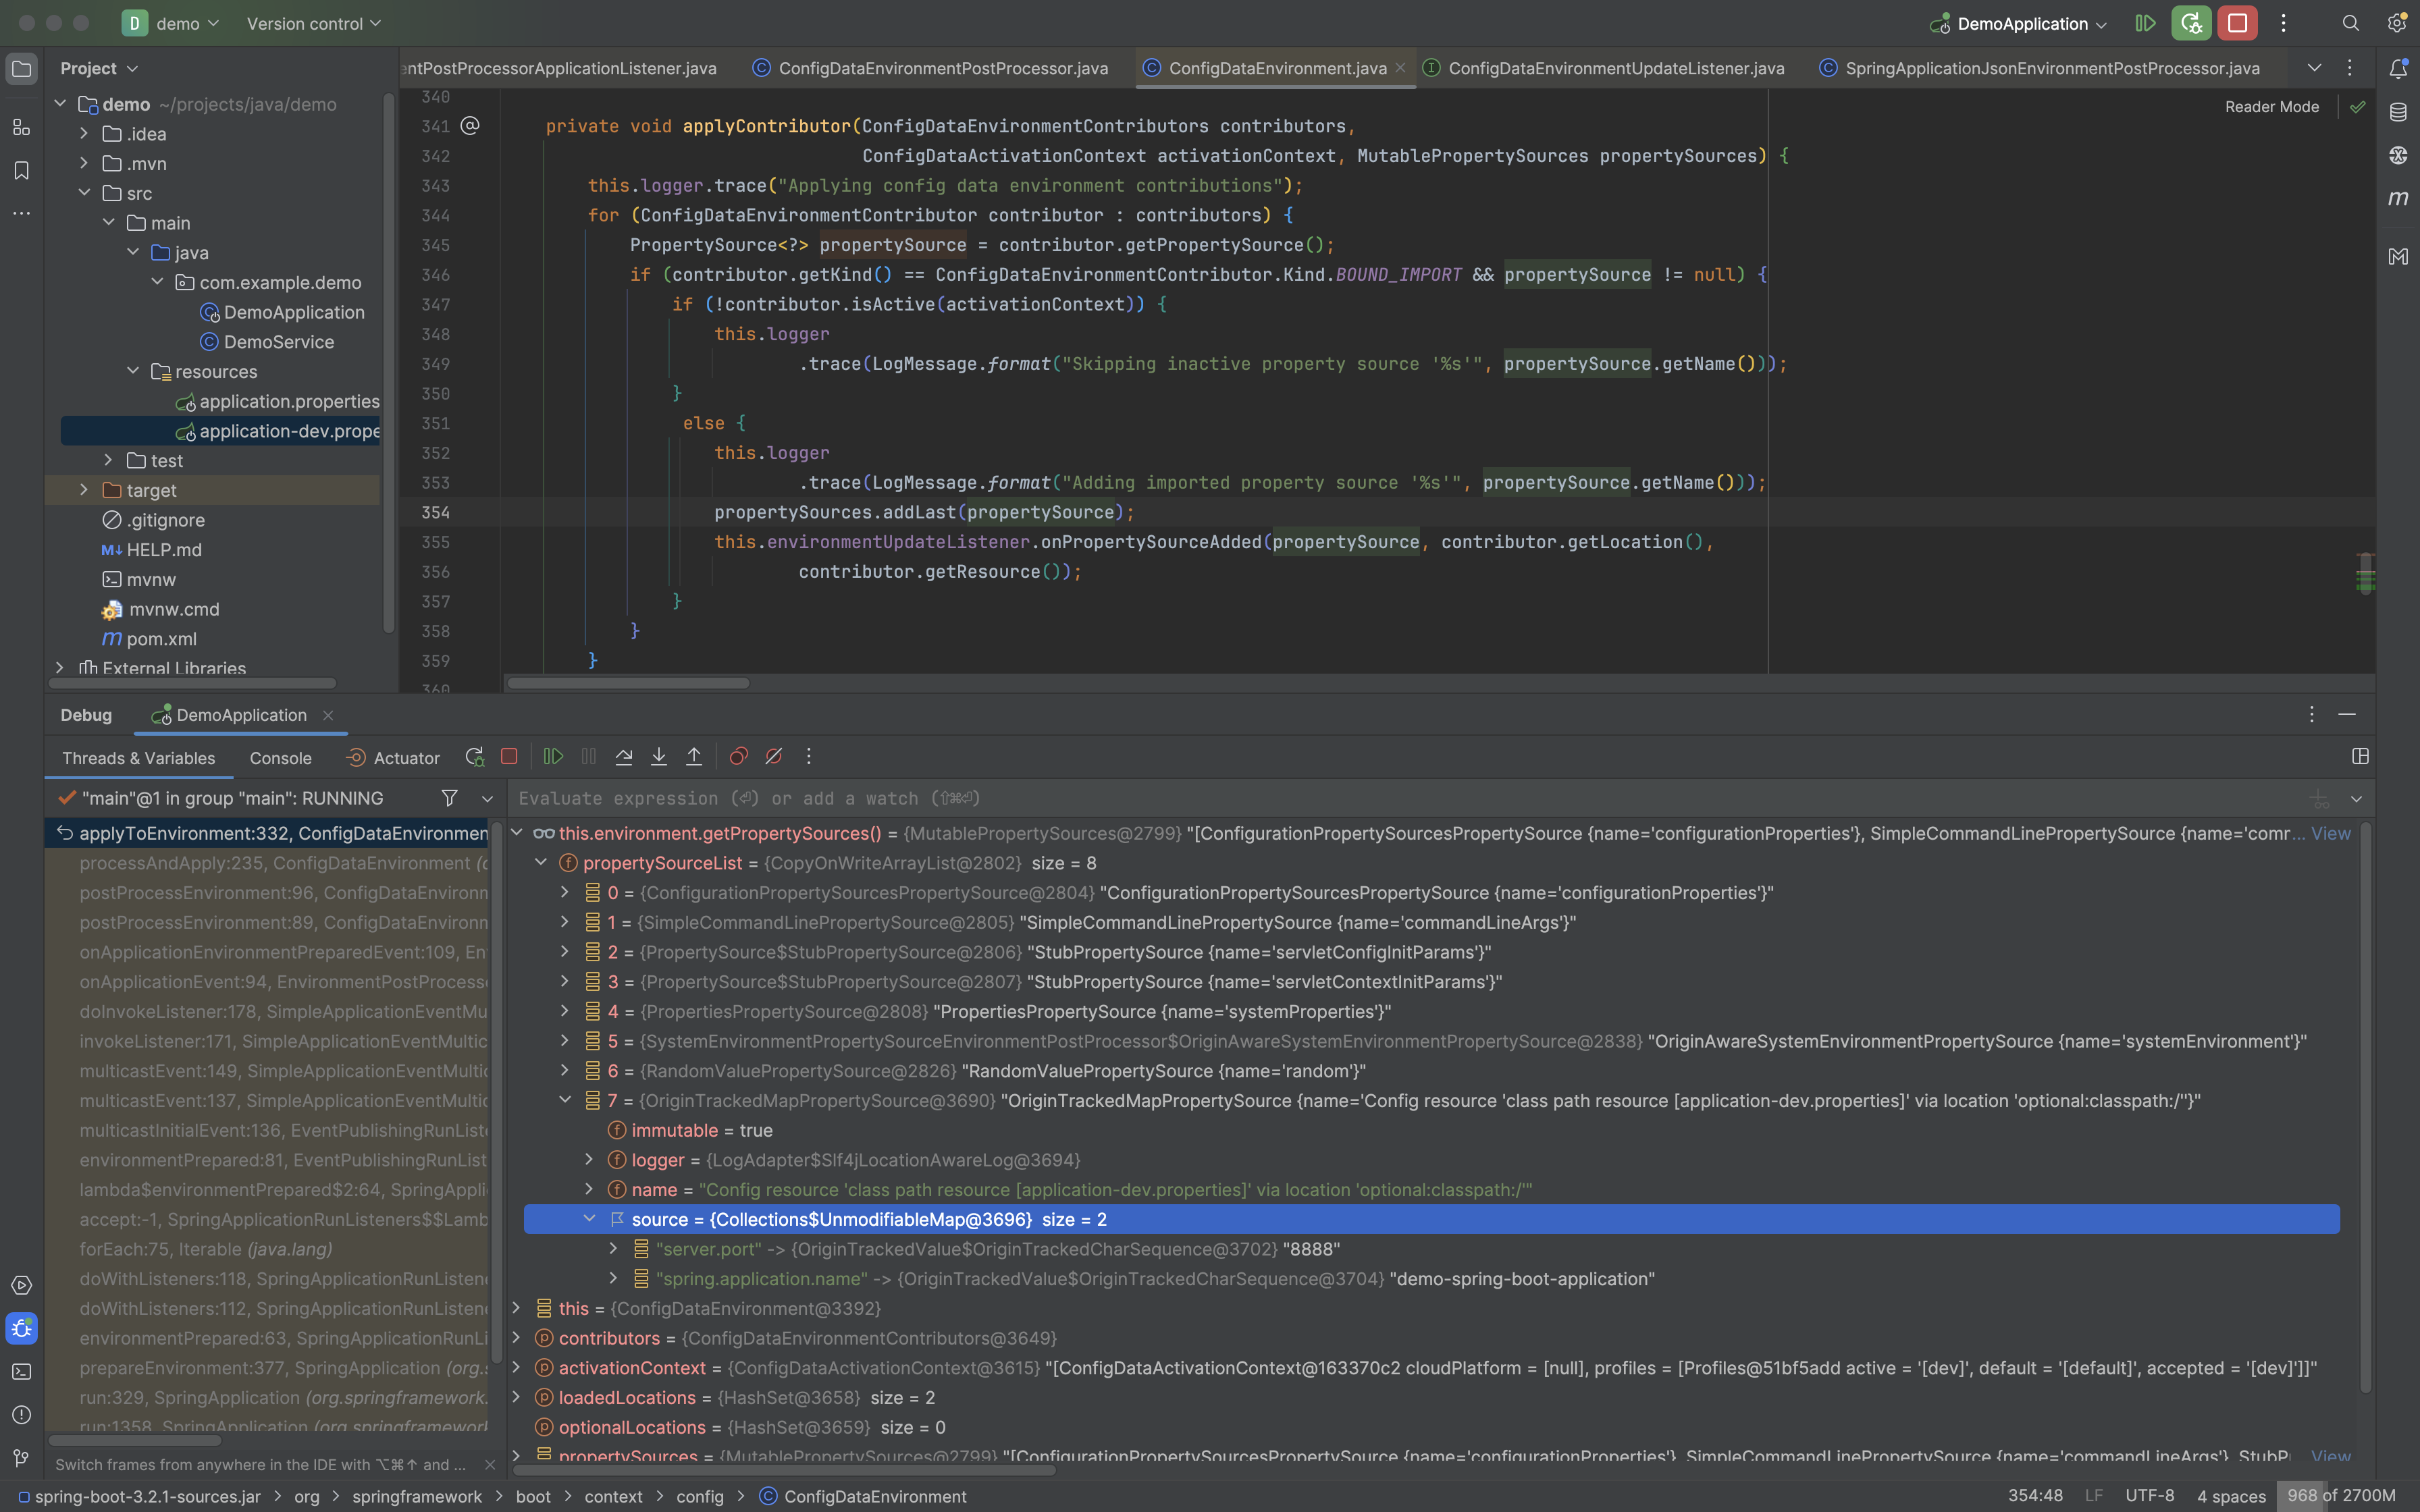
其中ConfigDataEnvironmentPostProcessor默认会从classpath:/、classpath:/config/、file:./、file:./config/、file:./config/*/这几个地方查找配置文件,如果有需要也可以通过spring.config.location、spring.config.additional-location、spring.config.import这三个配置来干预它从哪查找配置文件。
在查找到配置文件,并得到当前启用的profile后,ConfigDataEnvironment#applyToEnvironment方法就会将配置文件中的值加载到环境中。
然后Spring Boot会把这个environment对象与SpringApplication绑定起来。但是绑定这部分暂时也没看明白,依旧是专注于主线,以后有时间再说。
创建application context 这里会根据应用的类型(reactive或servlet)来创建对应的application context对象。
1
2
3
protected ConfigurableApplicationContext createApplicationContext () { return this .applicationContextFactory.create(this .webApplicationType); }
debug进去,走到了DefaultApplicationContextFactory的这两个方法中:
1
2
3
4
5
6
7
8
9
10
11
12
13
14
15
16
17
18
19
20
21
22
23
24
25
26
27
@Override public ConfigurableApplicationContext create (WebApplicationType webApplicationType) { try { return getFromSpringFactories( webApplicationType, ApplicationContextFactory::create, this ::createDefaultApplicationContext); } catch (Exception ex) { throw new IllegalStateException ("Unable create a default ApplicationContext instance, " + "you may need a custom ApplicationContextFactory" , ex); } } private <T> T getFromSpringFactories ( WebApplicationType webApplicationType, BiFunction<ApplicationContextFactory, WebApplicationType, T> action, Supplier<T> defaultResult ) { for (ApplicationContextFactory candidate : SpringFactoriesLoader.loadFactories(ApplicationContextFactory.class,getClass().getClassLoader())) { T result = action.apply(candidate, webApplicationType); if (result != null ) { return result; } } return (defaultResult != null ) ? defaultResult.get() : null ; }
在这个循环里它会分别执行ReactiveWebServerApplicationContextFactory和ServletWebServerApplicationContextFactory里面的create方法,而create方法里会判断当前应用的类型,来决定要不要创建对应的application context。
1
2
3
4
5
6
7
8
9
10
11
@Override public ConfigurableApplicationContext create (WebApplicationType webApplicationType) { return (webApplicationType != WebApplicationType.SERVLET) ? null : createContext(); } private ConfigurableApplicationContext createContext () { if (!AotDetector.useGeneratedArtifacts()) { return new AnnotationConfigServletWebServerApplicationContext (); } return new ServletWebServerApplicationContext (); }
创建好application context实例后,Spring Boot会开始准备context的内容。
1
2
3
4
5
6
7
8
9
10
11
12
13
14
15
16
17
18
19
20
21
22
23
24
25
26
27
28
29
30
31
32
33
34
35
36
37
38
39
40
41
42
43
44
45
46
47
48
49
50
51
52
53
54
55
56
57
58
59
private void prepareContext ( DefaultBootstrapContext bootstrapContext, ConfigurableApplicationContext context, ConfigurableEnvironment environment, SpringApplicationRunListeners listeners, ApplicationArguments applicationArguments, Banner printedBanner ) { context.setEnvironment(environment); postProcessApplicationContext(context); addAotGeneratedInitializerIfNecessary(this .initializers); applyInitializers(context); listeners.contextPrepared(context); bootstrapContext.close(context); if (this .logStartupInfo) { logStartupInfo(context.getParent() == null ); logStartupProfileInfo(context); } ConfigurableListableBeanFactory beanFactory = context.getBeanFactory(); beanFactory.registerSingleton("springApplicationArguments" , applicationArguments); if (printedBanner != null ) { beanFactory.registerSingleton("springBootBanner" , printedBanner); } if (beanFactory instanceof AbstractAutowireCapableBeanFactory autowireCapableBeanFactory) { autowireCapableBeanFactory.setAllowCircularReferences(this .allowCircularReferences); if (beanFactory instanceof DefaultListableBeanFactory listableBeanFactory) { listableBeanFactory.setAllowBeanDefinitionOverriding(this .allowBeanDefinitionOverriding); } } if (this .lazyInitialization) { context.addBeanFactoryPostProcessor(new LazyInitializationBeanFactoryPostProcessor ()); } if (this .keepAlive) { context.addApplicationListener(new KeepAlive ()); } context.addBeanFactoryPostProcessor(new PropertySourceOrderingBeanFactoryPostProcessor (context)); if (!AotDetector.useGeneratedArtifacts()) { Set<Object> sources = getAllSources(); Assert.notEmpty(sources, "Sources must not be empty" ); load(context, sources.toArray(new Object [0 ])); } listeners.contextLoaded(context); }
注册启动相关的单例bean 我对注册启动相关的单例bean很感兴趣,于是逐层点进registerSingleton的实现,看到了下列代码:
1 2 3 4 5 6 7 8 9 10 11 12 13 14 15 16 17 18 19 20 21 22 23 24 25 26 27 28 29 30 31 @Override public void registerSingleton (String beanName, Object singletonObject) throws IllegalStateException { super .registerSingleton(beanName, singletonObject); updateManualSingletonNames(set -> set.add(beanName), set -> !this .beanDefinitionMap.containsKey(beanName)); clearByTypeCache(); } @Override public void registerSingleton (String beanName, Object singletonObject) throws IllegalStateException { Assert.notNull(beanName, "Bean name must not be null" ); Assert.notNull(singletonObject, "Singleton object must not be null" ); synchronized (this .singletonObjects) { Object oldObject = this .singletonObjects.get(beanName); if (oldObject != null ) { throw new IllegalStateException ("Could not register object [" + singletonObject + "] under bean name '" + beanName + "': there is already object [" + oldObject + "] bound" ); } addSingleton(beanName, singletonObject); } } protected void addSingleton (String beanName, Object singletonObject) { synchronized (this .singletonObjects) { this .singletonObjects.put(beanName, singletonObject); this .singletonFactories.remove(beanName); this .earlySingletonObjects.remove(beanName); this .registeredSingletons.add(beanName); } }
看下来就是,在注册一个单例bean的时候,会传进来bean的名字和实际的对象。在registerSingleton中首先检查这个名字是不是已经被注册过了,没有被注册过的话就会调用addSingleton来注册。而所谓注册,就是:
在singletonObjects这个Map里面增加一个条目,key是bean的名字,value是bean对应的对象;
从singletonFactories和earlySingletonObjects中删掉以这个bean名字为key的条目;
在registeredSingletons这个Set里面记录这次注册的bean的名字。
上面提到的这三个Map实际上就是Spring的三级缓存。
singletonObjects是一级缓存,存储的是完整创建好的单例bean对象。在创建一个单例bean时,Spring会先从这里尝试获取这个bean的实例,如果找到则直接返回,否则继续创建这个bean;earlySingletonObjects是二级缓存,存储的是尚未完全创建好的“半成品”单例bean对象。在创建单例bean时,如果发现这个bean存在循环依赖,那么Spring会先创建这个bean的“半成品”对象并将其存到这里。当循环依赖的bean创建完成后,Spring再将这里存储的代理对象替换为完整的bean对象;singletonFactories是三级缓存,存储的是单例bean的创建工厂。当一个单例bean被创建时,Spring会先将该bean的创建工厂存储到这里,然后再执行工厂的getObject()方法生成该bean的实例对象。在该bean被其他bean引用时,Spring会从这里获取该bean的创建工厂来创建出这个bean的实例,并将这个实例存储到singletonObjects中。
返回到registerSingleton之后,继续执行updateManualSingletonNames方法:
1
2
3
4
5
6
7
8
9
10
11
12
13
14
15
16
17
18
private void updateManualSingletonNames (Consumer<Set<String>> action, Predicate<Set<String>> condition) { if (hasBeanCreationStarted()) { synchronized (this .beanDefinitionMap) { if (condition.test(this .manualSingletonNames)) { Set<String> updatedSingletons = new LinkedHashSet <>(this .manualSingletonNames); action.accept(updatedSingletons); this .manualSingletonNames = updatedSingletons; } } } else { if (condition.test(this .manualSingletonNames)) { action.accept(this .manualSingletonNames); } } }
在应用启动的时候,方法会走到else这部分,也就是直接向manualSingletonNames这个Set添加这次注册的bean的名字。manualSingletonNames这个Set存放的就是手动注册的各个bean的名字。
然后执行clearByTypeCache方法,把这两个cache清除。
1
2
3
4
private void clearByTypeCache () { this .allBeanNamesByType.clear(); this .singletonBeanNamesByType.clear(); }
加载primarySources和sources getAllSources会把primarySources和sources放进一个Set里面返回。
1
2
3
4
5
6
7
8
9
10
11
public Set<Object> getAllSources () { Set<Object> allSources = new LinkedHashSet <>(); if (!CollectionUtils.isEmpty(this .primarySources)) { allSources.addAll(this .primarySources); } if (!CollectionUtils.isEmpty(this .sources)) { allSources.addAll(this .sources); } return Collections.unmodifiableSet(allSources); }
然后走到load方法,把bean加载到application context:
1
2
3
4
5
6
7
8
9
10
11
12
13
14
15
16
17
18
19
20
21
22
23
24
25
26
27
28
29
30
31
32
33
34
35
36
37
38
39
40
41
42
43
44
45
46
protected void load (ApplicationContext context, Object[] sources) { if (logger.isDebugEnabled()) { logger.debug("Loading source " + StringUtils.arrayToCommaDelimitedString(sources)); } BeanDefinitionLoader loader = createBeanDefinitionLoader(getBeanDefinitionRegistry(context), sources); if (this .beanNameGenerator != null ) { loader.setBeanNameGenerator(this .beanNameGenerator); } if (this .resourceLoader != null ) { loader.setResourceLoader(this .resourceLoader); } if (this .environment != null ) { loader.setEnvironment(this .environment); } loader.load(); } private BeanDefinitionRegistry getBeanDefinitionRegistry (ApplicationContext context) { if (context instanceof BeanDefinitionRegistry registry) { return registry; } if (context instanceof AbstractApplicationContext abstractApplicationContext) { return (BeanDefinitionRegistry) abstractApplicationContext.getBeanFactory(); } throw new IllegalStateException ("Could not locate BeanDefinitionRegistry" ); } protected BeanDefinitionLoader createBeanDefinitionLoader (BeanDefinitionRegistry registry, Object[] sources) { return new BeanDefinitionLoader (registry, sources); } BeanDefinitionLoader(BeanDefinitionRegistry registry, Object... sources) { Assert.notNull(registry, "Registry must not be null" ); Assert.notEmpty(sources, "Sources must not be empty" ); this .sources = sources; this .annotatedReader = new AnnotatedBeanDefinitionReader (registry); this .xmlReader = new XmlBeanDefinitionReader (registry); this .groovyReader = (isGroovyPresent() ? new GroovyBeanDefinitionReader (registry) : null ); this .scanner = new ClassPathBeanDefinitionScanner (registry); this .scanner.addExcludeFilter(new ClassExcludeFilter (sources)); }
首先这里会执行getBeanDefinitionRegistry方法。因为这个应用的application context是一个AnnotationConfigServletWebServerApplicationContext,而它又层层继承于BeanDefinitionRegistry,所以这里返回的就是当前的application context。得到bean defininition registry之后,就会用它来初始化一个BeanDefinitionLoader对象。BeanDefinitionLoader的构造方法里面会初始化各种reader和scanner,来支持从不同的资源(XML、Java Config等)加载bean definition。
得到BeanDefinitionLoader后,Spring Boot会把bean名字的生成器等自定义部件绑定上去。不过默认情况下它们都是null。然后,就会执行BeanDefinitionLoader的load方法。
1
2
3
4
5
6
7
8
9
10
11
12
13
14
15
16
17
18
19
20
21
22
23
24
25
26
27
28
29
30
31
32
33
34
35
36
37
38
39
40
41
42
void load () { for (Object source : this .sources) { load(source); } } private void load (Object source) { Assert.notNull(source, "Source must not be null" ); if (source instanceof Class<?> clazz) { load(clazz); return ; } if (source instanceof Resource resource) { load(resource); return ; } if (source instanceof Package pack) { load(pack); return ; } if (source instanceof CharSequence sequence) { load(sequence); return ; } throw new IllegalArgumentException ("Invalid source type " + source.getClass()); } private void load (Class<?> source) { if (isGroovyPresent() && GroovyBeanDefinitionSource.class.isAssignableFrom(source)) { GroovyBeanDefinitionSource loader = BeanUtils.instantiateClass(source, GroovyBeanDefinitionSource.class); ((GroovyBeanDefinitionReader) this .groovyReader).beans(loader.getBeans()); } if (isEligible(source)) { this .annotatedReader.register(source); } } private boolean isEligible (Class<?> type) { return !(type.isAnonymousClass() || isGroovyClosure(type) || hasNoConstructors(type)); }
虽然这里会遍历sources,但是实际上sources里面只有应用的主启动类,所以最终会走到load(Class<?> source)方法中。因为应用中没有Groovy,所以第一个判断会被跳过,然后经过isEligible中的三个判断之后,走进register方法,并最终进入AnnotatedBeanDefinition#doRegisterBean方法中。
1 2 3 4 5 6 7 8 9 10 11 12 13 14 15 16 17 18 19 20 21 22 23 24 25 26 27 28 29 30 31 32 33 34 35 36 37 38 39 40 41 42 43 44 45 46 47 48 49 50 51 52 53 54 55 56 57 58 59 60 61 62 63 64 65 66 67 68 69 70 71 72 73 74 75 76 77 78 79 80 81 82 83 84 85 86 87 88 89 public void register (Class<?>... componentClasses) { for (Class<?> componentClass : componentClasses) { registerBean(componentClass); } } public void registerBean (Class<?> beanClass) { doRegisterBean(beanClass, null , null , null , null ); } private <T> void doRegisterBean ( Class<T> beanClass, @Nullable String name, @Nullable Class<? extends Annotation>[] qualifiers, @Nullable Supplier<T> supplier, @Nullable BeanDefinitionCustomizer[] customizers ) { AnnotatedGenericBeanDefinition abd = new AnnotatedGenericBeanDefinition (beanClass); if (this .conditionEvaluator.shouldSkip(abd.getMetadata())) { return ; } abd.setAttribute(ConfigurationClassUtils.CANDIDATE_ATTRIBUTE, Boolean.TRUE); abd.setInstanceSupplier(supplier); ScopeMetadata scopeMetadata = this .scopeMetadataResolver.resolveScopeMetadata(abd); abd.setScope(scopeMetadata.getScopeName()); String beanName = (name != null ? name : this .beanNameGenerator.generateBeanName(abd, this .registry)); AnnotationConfigUtils.processCommonDefinitionAnnotations(abd); if (qualifiers != null ) { for (Class<? extends Annotation > qualifier : qualifiers) { if (Primary.class == qualifier) { abd.setPrimary(true ); } else if (Lazy.class == qualifier) { abd.setLazyInit(true ); } else { abd.addQualifier(new AutowireCandidateQualifier (qualifier)); } } } if (customizers != null ) { for (BeanDefinitionCustomizer customizer : customizers) { customizer.customize(abd); } } BeanDefinitionHolder definitionHolder = new BeanDefinitionHolder (abd, beanName); definitionHolder = AnnotationConfigUtils.applyScopedProxyMode(scopeMetadata, definitionHolder, this .registry); BeanDefinitionReaderUtils.registerBeanDefinition(definitionHolder, this .registry); } static void processCommonDefinitionAnnotations (AnnotatedBeanDefinition abd, AnnotatedTypeMetadata metadata) { AnnotationAttributes lazy = attributesFor(metadata, Lazy.class); if (lazy != null ) { abd.setLazyInit(lazy.getBoolean("value" )); } else if (abd.getMetadata() != metadata) { lazy = attributesFor(abd.getMetadata(), Lazy.class); if (lazy != null ) { abd.setLazyInit(lazy.getBoolean("value" )); } } if (metadata.isAnnotated(Primary.class.getName())) { abd.setPrimary(true ); } AnnotationAttributes dependsOn = attributesFor(metadata, DependsOn.class); if (dependsOn != null ) { abd.setDependsOn(dependsOn.getStringArray("value" )); } AnnotationAttributes role = attributesFor(metadata, Role.class); if (role != null ) { abd.setRole(role.getNumber("value" ).intValue()); } AnnotationAttributes description = attributesFor(metadata, Description.class); if (description != null ) { abd.setDescription(description.getString("value" )); } }
这里会处理传进来的类,为它创建一个BeanDefinition并设置各种属性,然后调用BeanDefinitionReaderUtils#registerBeanDefinition把这个bean注册到application context中。因为这一步传进来的只有主启动类,所以只会注册一个由主启动类生成的bean。
1
2
3
4
5
6
7
8
9
10
11
12
13
14
15
16
17
18
19
20
21
22
23
24
25
26
27
28
29
30
31
32
33
34
35
36
37
38
39
40
41
42
43
44
45
46
47
48
49
50
51
52
53
54
55
56
57
58
59
60
61
62
63
64
65
66
67
68
69
70
71
72
73
74
75
76
77
78
79
80
81
82
83
84
85
86
87
88
89
90
91
92
93
94
95
96
97
98
99
100
101
102
103
104
105
106
107
108
109
110
111
112
113
114
115
116
117
118
119
120
121
public static void registerBeanDefinition ( BeanDefinitionHolder definitionHolder, BeanDefinitionRegistry registry ) throws BeanDefinitionStoreException { String beanName = definitionHolder.getBeanName(); registry.registerBeanDefinition(beanName, definitionHolder.getBeanDefinition()); String[] aliases = definitionHolder.getAliases(); if (aliases != null ) { for (String alias : aliases) { registry.registerAlias(beanName, alias); } } } @Override public void registerBeanDefinition (String beanName, BeanDefinition beanDefinition) throws BeanDefinitionStoreException { this .beanFactory.registerBeanDefinition(beanName, beanDefinition); } @Override public void registerBeanDefinition (String beanName, BeanDefinition beanDefinition) throws BeanDefinitionStoreException { Assert.hasText(beanName, "Bean name must not be empty" ); Assert.notNull(beanDefinition, "BeanDefinition must not be null" ); if (beanDefinition instanceof AbstractBeanDefinition abd) { try { abd.validate(); } catch (BeanDefinitionValidationException ex) { throw new BeanDefinitionStoreException (beanDefinition.getResourceDescription(), beanName, "Validation of bean definition failed" , ex); } } BeanDefinition existingDefinition = this .beanDefinitionMap.get(beanName); if (existingDefinition != null ) { if (!isBeanDefinitionOverridable(beanName)) { throw new BeanDefinitionOverrideException (beanName, beanDefinition, existingDefinition); } else if (existingDefinition.getRole() < beanDefinition.getRole()) { if (logger.isInfoEnabled()) { logger.info("Overriding user-defined bean definition for bean '" + beanName + "' with a framework-generated bean definition: replacing [" + existingDefinition + "] with [" + beanDefinition + "]" ); } } else if (!beanDefinition.equals(existingDefinition)) { if (logger.isDebugEnabled()) { logger.debug("Overriding bean definition for bean '" + beanName + "' with a different definition: replacing [" + existingDefinition + "] with [" + beanDefinition + "]" ); } } else { if (logger.isTraceEnabled()) { logger.trace("Overriding bean definition for bean '" + beanName + "' with an equivalent definition: replacing [" + existingDefinition + "] with [" + beanDefinition + "]" ); } } this .beanDefinitionMap.put(beanName, beanDefinition); } else { if (isAlias(beanName)) { String aliasedName = canonicalName(beanName); if (!isBeanDefinitionOverridable(aliasedName)) { if (containsBeanDefinition(aliasedName)) { throw new BeanDefinitionOverrideException ( beanName, beanDefinition, getBeanDefinition(aliasedName)); } else { throw new BeanDefinitionStoreException (beanDefinition.getResourceDescription(), beanName, "Cannot register bean definition for bean '" + beanName + "' since there is already an alias for bean '" + aliasedName + "' bound." ); } } else { removeAlias(beanName); } } if (hasBeanCreationStarted()) { synchronized (this .beanDefinitionMap) { this .beanDefinitionMap.put(beanName, beanDefinition); List<String> updatedDefinitions = new ArrayList <>(this .beanDefinitionNames.size() + 1 ); updatedDefinitions.addAll(this .beanDefinitionNames); updatedDefinitions.add(beanName); this .beanDefinitionNames = updatedDefinitions; removeManualSingletonName(beanName); } } else { this .beanDefinitionMap.put(beanName, beanDefinition); this .beanDefinitionNames.add(beanName); removeManualSingletonName(beanName); } this .frozenBeanDefinitionNames = null ; } if (existingDefinition != null || containsSingleton(beanName)) { resetBeanDefinition(beanName); } else if (isConfigurationFrozen()) { clearByTypeCache(); } }
在启动的时候,实际会走到registerBeanDefinition方法的// Still in startup registration phase这部分。这里会把传进来的BeanDefinition注册到beanDefinitionMap中然后返回。
刷新application context 在创建application context之后,Spring Boot会刷新它。
1
2
3
4
5
6
7
8
9
10
11
12
13
14
15
16
17
18
19
20
21
22
23
24
25
26
27
28
29
30
31
32
33
34
35
36
37
38
39
40
41
42
43
44
45
46
47
48
49
50
51
52
53
54
55
56
57
58
59
60
61
62
63
64
65
66
67
68
69
70
71
72
73
74
75
76
77
78
79
80
81
82
83
84
85
86
87
88
89
90
91
92
93
94
95
96
97
98
99
100
101
102
103
104
105
106
107
108
109
110
111
private void refreshContext (ConfigurableApplicationContext context) { if (this .registerShutdownHook) { shutdownHook.registerApplicationContext(context); } refresh(context); } protected void refresh (ConfigurableApplicationContext applicationContext) { applicationContext.refresh(); } public final void refresh () throws BeansException, IllegalStateException { try { super .refresh(); } catch (RuntimeException ex) { WebServer webServer = this .webServer; if (webServer != null ) { webServer.stop(); webServer.destroy(); } throw ex; } } public void refresh () throws BeansException, IllegalStateException { this .startupShutdownLock.lock(); try { this .startupShutdownThread = Thread.currentThread(); StartupStep contextRefresh = this .applicationStartup.start("spring.context.refresh" ); prepareRefresh(); ConfigurableListableBeanFactory beanFactory = obtainFreshBeanFactory(); prepareBeanFactory(beanFactory); try { postProcessBeanFactory(beanFactory); StartupStep beanPostProcess = this .applicationStartup.start("spring.context.beans.post-process" ); invokeBeanFactoryPostProcessors(beanFactory); registerBeanPostProcessors(beanFactory); beanPostProcess.end(); initMessageSource(); initApplicationEventMulticaster(); onRefresh(); registerListeners(); finishBeanFactoryInitialization(beanFactory); finishRefresh(); } catch (RuntimeException | Error ex ) { if (logger.isWarnEnabled()) { logger.warn("Exception encountered during context initialization - " + "cancelling refresh attempt: " + ex); } destroyBeans(); cancelRefresh(ex); throw ex; } finally { contextRefresh.end(); } } finally { this .startupShutdownThread = null ; this .startupShutdownLock.unlock(); } }
这里首先会一路走到AbstractApplicationContext#refresh方法,完成初始化bean factory,实例化剩余的bean等操作。
得到当前application context的bean factory 点进obtainFreshBeanFactory方法可以看到这样的实现:
1 2 3 4 5 6 7 8 9 10 11 12 13 14 15 16 17 18 19 20 21 22 protected ConfigurableListableBeanFactory obtainFreshBeanFactory () { refreshBeanFactory(); return getBeanFactory(); } private final AtomicBoolean refreshed = new AtomicBoolean ();@Override protected final void refreshBeanFactory () throws IllegalStateException { if (!this .refreshed.compareAndSet(false , true )) { throw new IllegalStateException ( "GenericApplicationContext does not support multiple refresh attempts: just call 'refresh' once" ); } this .beanFactory.setSerializationId(getId()); } @Override public final ConfigurableListableBeanFactory getBeanFactory () { return this .beanFactory; }
在refreshBeanFactory方法中,Spring会利用AtomicBoolean的compareAndSet方法来保证这个方法绝对只会被执行一次。
调用beanFactory的后置处理 invokeBeanFactoryPostProcessors这里会完成IoC容器初始化的三个步骤,分别是
Resource定位BeanDefinition,那么在这里它会解析启动类的BeanDefinition,得到启动类所在的包并将其作为basePackage,这就完成了定位的过程。@EnableXXX注解中通过@Import指定的配置类。
BeanDefinition载入basePackage后,Spring Boot会把路径拼接成classpath*:com/example/demo/**/*.class这样的形式,然后PathMatchingResourcePatternResolver类会把这个路径下所有的class都加载进来,然后遍历判断有没有@Component注解。因为@Controller、@Service、@Configuration之类的实际上只是把@Component又包了一层,所以不用单独扫描它们。
注册BeanDefinitionBeanDefinitionRegister接口的实现类会把解析到的BeanDefinition向IoC容器注册。
这部分实在是太长,而本文又已经够长了,所以我会单开一篇来细说 。
把剩余尚未实例化的bean实例化 1 2 3 4 5 6 7 8 9 10 11 12 13 14 15 16 17 18 19 20 21 22 23 24 25 26 27 28 29 30 31 32 33 34 35 36 37 38 39 40 41 42 43 44 45 46 47 48 49 50 51 52 53 54 55 56 57 58 59 60 61 62 63 64 65 66 67 68 protected void finishBeanFactoryInitialization (ConfigurableListableBeanFactory beanFactory) { if (beanFactory.containsBean(CONVERSION_SERVICE_BEAN_NAME) && beanFactory.isTypeMatch(CONVERSION_SERVICE_BEAN_NAME, ConversionService.class)) { beanFactory.setConversionService( beanFactory.getBean(CONVERSION_SERVICE_BEAN_NAME, ConversionService.class)); } if (!beanFactory.hasEmbeddedValueResolver()) { beanFactory.addEmbeddedValueResolver(strVal -> getEnvironment().resolvePlaceholders(strVal)); } String[] weaverAwareNames = beanFactory.getBeanNamesForType(LoadTimeWeaverAware.class, false , false ); for (String weaverAwareName : weaverAwareNames) { getBean(weaverAwareName); } beanFactory.setTempClassLoader(null ); beanFactory.freezeConfiguration(); beanFactory.preInstantiateSingletons(); } public void preInstantiateSingletons () throws BeansException { if (logger.isTraceEnabled()) { logger.trace("Pre-instantiating singletons in " + this ); } List<String> beanNames = new ArrayList <>(this .beanDefinitionNames); for (String beanName : beanNames) { RootBeanDefinition bd = getMergedLocalBeanDefinition(beanName); if (!bd.isAbstract() && bd.isSingleton() && !bd.isLazyInit()) { if (isFactoryBean(beanName)) { Object bean = getBean(FACTORY_BEAN_PREFIX + beanName); if (bean instanceof SmartFactoryBean<?> smartFactoryBean && smartFactoryBean.isEagerInit()) { getBean(beanName); } } else { getBean(beanName); } } } for (String beanName : beanNames) { Object singletonInstance = getSingleton(beanName); if (singletonInstance instanceof SmartInitializingSingleton smartSingleton) { StartupStep smartInitialize = getApplicationStartup().start("spring.beans.smart-initialize" ).tag("beanName" , beanName); smartSingleton.afterSingletonsInstantiated(); smartInitialize.end(); } } }
第一个for循环的重点在于getBean方法,逐层点进实现,最终会进入AbstractBeanFactory#doGetBean方法。
1 2 3 4 5 6 7 8 9 10 11 12 13 14 15 16 17 18 19 20 21 22 23 24 25 26 27 28 29 30 31 32 33 34 35 36 37 38 39 40 41 42 43 44 45 46 47 48 49 50 51 52 53 54 55 56 57 58 59 60 61 62 63 64 65 66 67 68 69 70 71 72 73 74 75 76 77 78 79 80 81 82 83 84 85 86 87 88 89 90 91 92 93 94 95 96 97 98 99 100 101 102 103 104 105 106 107 108 109 110 111 112 113 114 115 116 117 118 119 120 121 122 123 124 125 126 127 128 129 130 131 132 133 134 135 136 137 138 139 140 141 142 143 144 145 146 147 148 149 150 151 152 153 154 155 156 157 158 159 160 161 162 163 164 165 166 167 protected <T> T doGetBean ( String name, @Nullable Class<T> requiredType, @Nullable Object[] args, boolean typeCheckOnly ) throws BeansException { String beanName = transformedBeanName(name); Object beanInstance; Object sharedInstance = getSingleton(beanName); if (sharedInstance != null && args == null ) { if (logger.isTraceEnabled()) { if (isSingletonCurrentlyInCreation(beanName)) { logger.trace("Returning eagerly cached instance of singleton bean '" + beanName + "' that is not fully initialized yet - a consequence of a circular reference" ); } else { logger.trace("Returning cached instance of singleton bean '" + beanName + "'" ); } } beanInstance = getObjectForBeanInstance(sharedInstance, name, beanName, null ); } else { if (isPrototypeCurrentlyInCreation(beanName)) { throw new BeanCurrentlyInCreationException (beanName); } BeanFactory parentBeanFactory = getParentBeanFactory(); if (parentBeanFactory != null && !containsBeanDefinition(beanName)) { String nameToLookup = originalBeanName(name); if (parentBeanFactory instanceof AbstractBeanFactory abf) { return abf.doGetBean(nameToLookup, requiredType, args, typeCheckOnly); } else if (args != null ) { return (T) parentBeanFactory.getBean(nameToLookup, args); } else if (requiredType != null ) { return parentBeanFactory.getBean(nameToLookup, requiredType); } else { return (T) parentBeanFactory.getBean(nameToLookup); } } if (!typeCheckOnly) { markBeanAsCreated(beanName); } StartupStep beanCreation = this .applicationStartup.start("spring.beans.instantiate" ).tag("beanName" , name); try { if (requiredType != null ) { beanCreation.tag("beanType" , requiredType::toString); } RootBeanDefinition mbd = getMergedLocalBeanDefinition(beanName); checkMergedBeanDefinition(mbd, beanName, args); String[] dependsOn = mbd.getDependsOn(); if (dependsOn != null ) { for (String dep : dependsOn) { if (isDependent(beanName, dep)) { throw new BeanCreationException (mbd.getResourceDescription(), beanName, "Circular depends-on relationship between '" + beanName + "' and '" + dep + "'" ); } registerDependentBean(dep, beanName); try { getBean(dep); } catch (NoSuchBeanDefinitionException ex) { throw new BeanCreationException (mbd.getResourceDescription(), beanName, "'" + beanName + "' depends on missing bean '" + dep + "'" , ex); } } } if (mbd.isSingleton()) { sharedInstance = getSingleton(beanName, () -> { try { return createBean(beanName, mbd, args); } catch (BeansException ex) { destroySingleton(beanName); throw ex; } }); beanInstance = getObjectForBeanInstance(sharedInstance, name, beanName, mbd); } else if (mbd.isPrototype()) { Object prototypeInstance = null ; try { beforePrototypeCreation(beanName); prototypeInstance = createBean(beanName, mbd, args); } finally { afterPrototypeCreation(beanName); } beanInstance = getObjectForBeanInstance(prototypeInstance, name, beanName, mbd); } else { String scopeName = mbd.getScope(); if (!StringUtils.hasLength(scopeName)) { throw new IllegalStateException ("No scope name defined for bean '" + beanName + "'" ); } Scope scope = this .scopes.get(scopeName); if (scope == null ) { throw new IllegalStateException ("No Scope registered for scope name '" + scopeName + "'" ); } try { Object scopedInstance = scope.get(beanName, () -> { beforePrototypeCreation(beanName); try { return createBean(beanName, mbd, args); } finally { afterPrototypeCreation(beanName); } }); beanInstance = getObjectForBeanInstance(scopedInstance, name, beanName, mbd); } catch (IllegalStateException ex) { throw new ScopeNotActiveException (beanName, scopeName, ex); } } } catch (BeansException ex) { beanCreation.tag("exception" , ex.getClass().toString()); beanCreation.tag("message" , String.valueOf(ex.getMessage())); cleanupAfterBeanCreationFailure(beanName); throw ex; } finally { beanCreation.end(); if (!isCacheBeanMetadata()) { clearMergedBeanDefinition(beanName); } } } return adaptBeanInstance(name, beanInstance, requiredType); }
在检查bean是否存在时调用的getSingleton()是这样实现的:
1
2
3
4
5
6
7
8
9
10
11
12
13
14
15
16
17
18
19
20
21
22
23
24
25
26
27
28
29
30
31
@Nullable protected Object getSingleton (String beanName, boolean allowEarlyReference) { Object singletonObject = this .singletonObjects.get(beanName); if (singletonObject == null && isSingletonCurrentlyInCreation(beanName)) { singletonObject = this .earlySingletonObjects.get(beanName); if (singletonObject == null && allowEarlyReference) { synchronized (this .singletonObjects) { singletonObject = this .singletonObjects.get(beanName); if (singletonObject == null ) { singletonObject = this .earlySingletonObjects.get(beanName); if (singletonObject == null ) { ObjectFactory<?> singletonFactory = this .singletonFactories.get(beanName); if (singletonFactory != null ) { singletonObject = singletonFactory.getObject(); this .earlySingletonObjects.put(beanName, singletonObject); this .singletonFactories.remove(beanName); } } } } } } return singletonObject; }
如果Object sharedInstance = getSingleton(beanName)这一步得到的是null,那么容器就会调用getSingleton(String beanName, ObjectFactory<?> singletonFactory)方法来创建这个bean。传给singletonFactory的lambda表达式中调用了createBean()方法,它又调用了doCreateBean()方法完成实际的bean创建操作。
创建bean 1 2 3 4 5 6 7 8 9 10 11 12 13 14 15 16 17 18 19 20 21 22 23 24 25 26 27 28 29 30 31 32 33 34 35 36 37 38 39 40 41 42 43 44 45 46 47 48 49 50 51 52 53 54 55 56 57 58 59 60 61 62 63 64 65 66 67 68 69 70 71 72 73 74 75 76 77 78 79 80 81 82 83 84 85 86 87 88 89 90 91 92 93 94 95 96 97 98 99 100 101 102 103 protected Object doCreateBean (String beanName, RootBeanDefinition mbd, @Nullable Object[] args) throws BeanCreationException { BeanWrapper instanceWrapper = null ; if (mbd.isSingleton()) { instanceWrapper = this .factoryBeanInstanceCache.remove(beanName); } if (instanceWrapper == null ) { instanceWrapper = createBeanInstance(beanName, mbd, args); } Object bean = instanceWrapper.getWrappedInstance(); Class<?> beanType = instanceWrapper.getWrappedClass(); if (beanType != NullBean.class) { mbd.resolvedTargetType = beanType; } synchronized (mbd.postProcessingLock) { if (!mbd.postProcessed) { try { applyMergedBeanDefinitionPostProcessors(mbd, beanType, beanName); } catch (Throwable ex) { throw new BeanCreationException (mbd.getResourceDescription(), beanName, "Post-processing of merged bean definition failed" , ex); } mbd.markAsPostProcessed(); } } boolean earlySingletonExposure = (mbd.isSingleton() && this .allowCircularReferences && isSingletonCurrentlyInCreation(beanName)); if (earlySingletonExposure) { if (logger.isTraceEnabled()) { logger.trace("Eagerly caching bean '" + beanName + "' to allow for resolving potential circular references" ); } addSingletonFactory(beanName, () -> getEarlyBeanReference(beanName, mbd, bean)); } Object exposedObject = bean; try { populateBean(beanName, mbd, instanceWrapper); exposedObject = initializeBean(beanName, exposedObject, mbd); } catch (Throwable ex) { if (ex instanceof BeanCreationException bce && beanName.equals(bce.getBeanName())) { throw bce; } else { throw new BeanCreationException (mbd.getResourceDescription(), beanName, ex.getMessage(), ex); } } if (earlySingletonExposure) { Object earlySingletonReference = getSingleton(beanName, false ); if (earlySingletonReference != null ) { if (exposedObject == bean) { exposedObject = earlySingletonReference; } else if (!this .allowRawInjectionDespiteWrapping && hasDependentBean(beanName)) { String[] dependentBeans = getDependentBeans(beanName); Set<String> actualDependentBeans = new LinkedHashSet <>(dependentBeans.length); for (String dependentBean : dependentBeans) { if (!removeSingletonIfCreatedForTypeCheckOnly(dependentBean)) { actualDependentBeans.add(dependentBean); } } if (!actualDependentBeans.isEmpty()) { throw new BeanCurrentlyInCreationException (beanName, "Bean with name '" + beanName + "' has been injected into other beans [" + StringUtils.collectionToCommaDelimitedString(actualDependentBeans) + "] in its raw version as part of a circular reference, but has eventually been " + "wrapped. This means that said other beans do not use the final version of the " + "bean. This is often the result of over-eager type matching - consider using " + "'getBeanNamesForType' with the 'allowEagerInit' flag turned off, for example." ); } } } } try { registerDisposableBeanIfNecessary(beanName, bean, mbd); } catch (BeanDefinitionValidationException ex) { throw new BeanCreationException ( mbd.getResourceDescription(), beanName, "Invalid destruction signature" , ex); } return exposedObject; }
那么doCreateBean()方法是怎么创建bean的实例的呢?我们继续看createBeanInstance()方法。
1
2
3
4
5
6
7
8
9
10
11
12
13
14
15
16
17
18
19
20
21
22
23
24
25
26
27
28
29
30
31
32
33
34
35
36
37
38
39
40
41
42
43
44
45
46
47
48
49
50
51
52
53
54
55
56
57
58
59
60
61
62
63
protected BeanWrapper createBeanInstance (String beanName, RootBeanDefinition mbd, @Nullable Object[] args) { Class<?> beanClass = resolveBeanClass(mbd, beanName); if (beanClass != null && !Modifier.isPublic(beanClass.getModifiers()) && !mbd.isNonPublicAccessAllowed()) { throw new BeanCreationException (mbd.getResourceDescription(), beanName, "Bean class isn't public, and non-public access not allowed: " + beanClass.getName()); } Supplier<?> instanceSupplier = mbd.getInstanceSupplier(); if (instanceSupplier != null ) { return obtainFromSupplier(instanceSupplier, beanName, mbd); } if (mbd.getFactoryMethodName() != null ) { return instantiateUsingFactoryMethod(beanName, mbd, args); } boolean resolved = false ; boolean autowireNecessary = false ; if (args == null ) { synchronized (mbd.constructorArgumentLock) { if (mbd.resolvedConstructorOrFactoryMethod != null ) { resolved = true ; autowireNecessary = mbd.constructorArgumentsResolved; } } } if (resolved) { if (autowireNecessary) { return autowireConstructor(beanName, mbd, null , null ); } else { return instantiateBean(beanName, mbd); } } Constructor<?>[] ctors = determineConstructorsFromBeanPostProcessors(beanClass, beanName); if (ctors != null || mbd.getResolvedAutowireMode() == AUTOWIRE_CONSTRUCTOR || mbd.hasConstructorArgumentValues() || !ObjectUtils.isEmpty(args)) { return autowireConstructor(beanName, mbd, ctors, args); } ctors = mbd.getPreferredConstructors(); if (ctors != null ) { return autowireConstructor(beanName, mbd, ctors, null ); } return instantiateBean(beanName, mbd); }
设置被注入属性的值 完成实例化后就会开始填充这个bean的属性了,继续看populateBean()的实现。
1
2
3
4
5
6
7
8
9
10
11
12
13
14
15
16
17
18
19
20
21
22
23
24
25
26
27
28
29
30
31
32
33
34
35
36
37
38
39
40
41
42
43
44
45
46
47
48
49
50
51
52
53
54
55
56
57
58
59
60
61
62
63
64
65
66
67
68
69
70
71
72
73
74
75
76
77
78
protected void populateBean (String beanName, RootBeanDefinition mbd, @Nullable BeanWrapper bw) { if (bw == null ) { if (mbd.hasPropertyValues()) { throw new BeanCreationException ( mbd.getResourceDescription(), beanName, "Cannot apply property values to null instance" ); } else { return ; } } if (bw.getWrappedClass().isRecord()) { if (mbd.hasPropertyValues()) { throw new BeanCreationException ( mbd.getResourceDescription(), beanName, "Cannot apply property values to a record" ); } else { return ; } } if (!mbd.isSynthetic() && hasInstantiationAwareBeanPostProcessors()) { for (InstantiationAwareBeanPostProcessor bp : getBeanPostProcessorCache().instantiationAware) { if (!bp.postProcessAfterInstantiation(bw.getWrappedInstance(), beanName)) { return ; } } } PropertyValues pvs = (mbd.hasPropertyValues() ? mbd.getPropertyValues() : null ); int resolvedAutowireMode = mbd.getResolvedAutowireMode(); if (resolvedAutowireMode == AUTOWIRE_BY_NAME || resolvedAutowireMode == AUTOWIRE_BY_TYPE) { MutablePropertyValues newPvs = new MutablePropertyValues (pvs); if (resolvedAutowireMode == AUTOWIRE_BY_NAME) { autowireByName(beanName, mbd, bw, newPvs); } if (resolvedAutowireMode == AUTOWIRE_BY_TYPE) { autowireByType(beanName, mbd, bw, newPvs); } pvs = newPvs; } if (hasInstantiationAwareBeanPostProcessors()) { if (pvs == null ) { pvs = mbd.getPropertyValues(); } for (InstantiationAwareBeanPostProcessor bp : getBeanPostProcessorCache().instantiationAware) { PropertyValues pvsToUse = bp.postProcessProperties(pvs, bw.getWrappedInstance(), beanName); if (pvsToUse == null ) { return ; } pvs = pvsToUse; } } boolean needsDepCheck = (mbd.getDependencyCheck() != AbstractBeanDefinition.DEPENDENCY_CHECK_NONE); if (needsDepCheck) { PropertyDescriptor[] filteredPds = filterPropertyDescriptorsForDependencyCheck(bw, mbd.allowCaching); checkDependencies(beanName, mbd, filteredPds, pvs); } if (pvs != null ) { applyPropertyValues(beanName, mbd, bw, pvs); } }
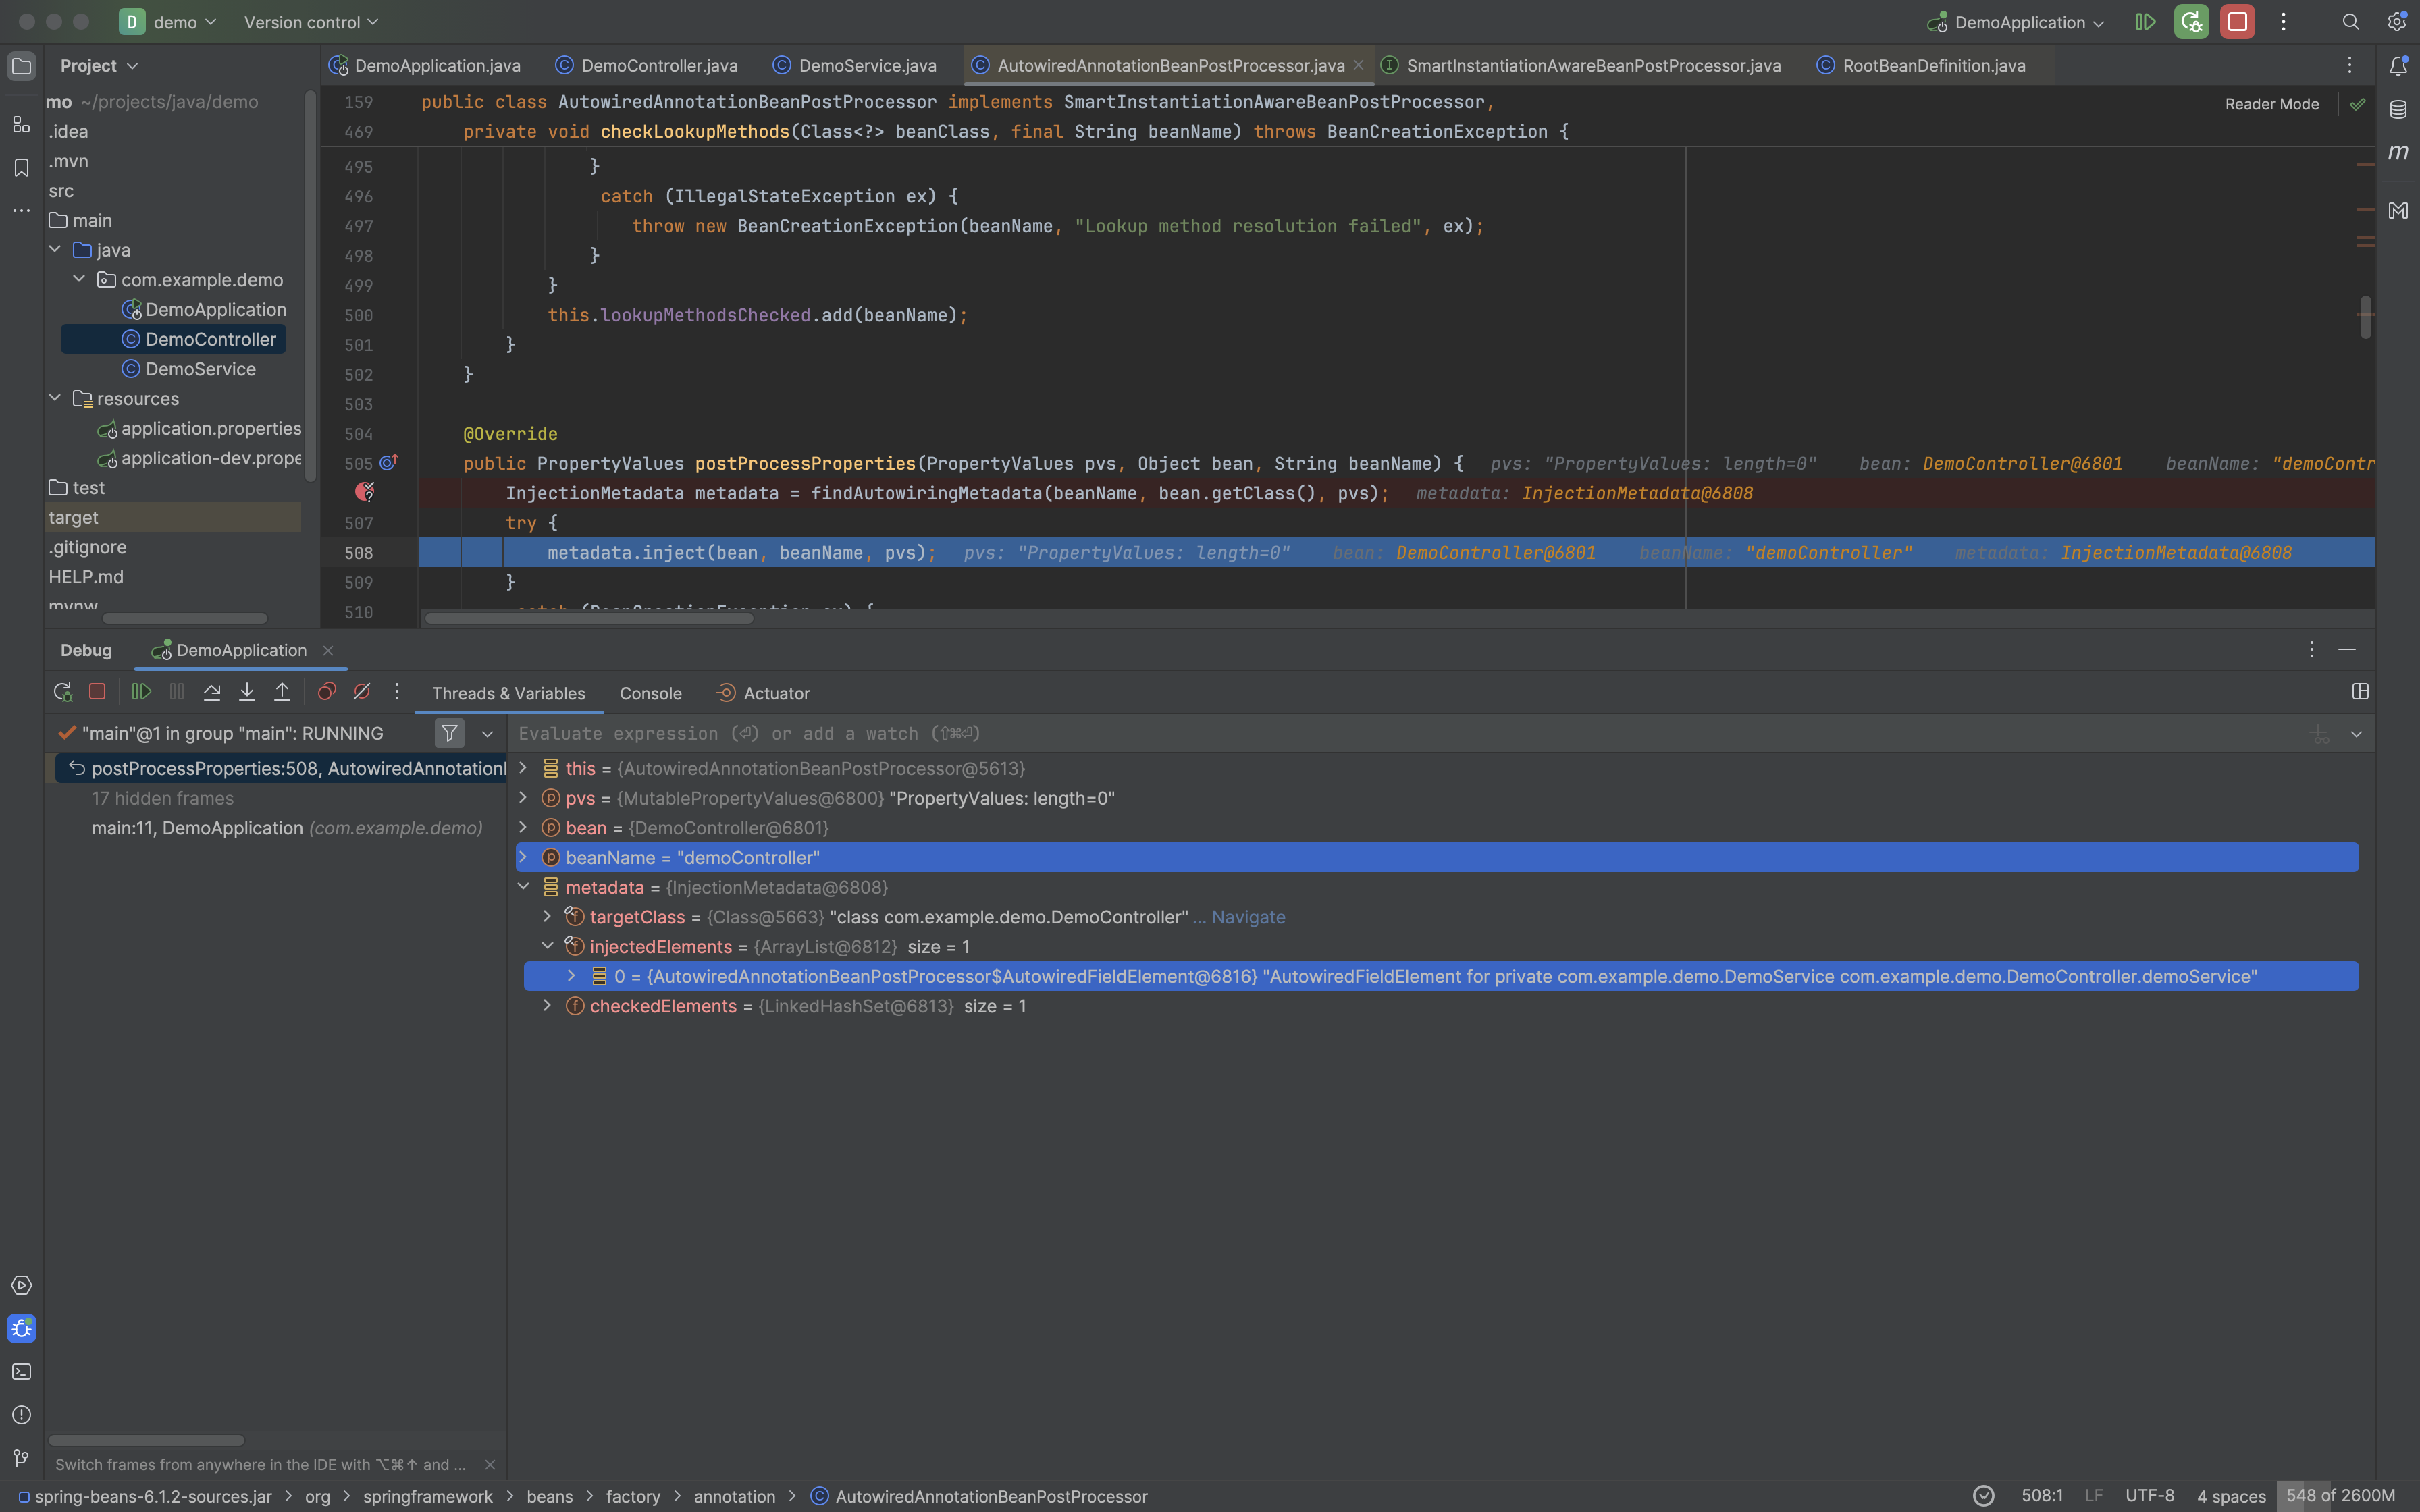
上面代码中PropertyValues pvsToUse = bp.postProcessProperties(pvs, bw.getWrappedInstance(), beanName)这一行完成了@Autowire等注解的注入,那么继续看它的实现。
1 2 3 4 5 6 7 8 9 10 11 12 13 14 15 16 public PropertyValues postProcessProperties (PropertyValues pvs, Object bean, String beanName) { InjectionMetadata metadata = findAutowiringMetadata(beanName, bean.getClass(), pvs); try { metadata.inject(bean, beanName, pvs); } catch (BeanCreationException ex) { throw ex; } catch (Throwable ex) { throw new BeanCreationException (beanName, "Injection of autowired dependencies failed" , ex); } return pvs; }
我创建了一个DemoController,并在其中用属性注入的方式声明需要注入DemoService(@Autowired private DemoService demoService),然后在findAutowiringMetadata这行下个断点调试,就能看到这样的结果:
具体的注入是这样实现的:
1
2
3
4
5
6
7
8
9
10
11
12
13
14
15
16
17
18
19
20
21
22
23
24
25
protected void inject (Object bean, @Nullable String beanName, @Nullable PropertyValues pvs) throws Throwable { Field field = (Field) this .member; Object value; if (this .cached) { try { value = resolveCachedArgument(beanName, this .cachedFieldValue); } catch (BeansException ex) { this .cached = false ; logger.debug("Failed to resolve cached argument" , ex); value = resolveFieldValue(field, bean, beanName); } } else { value = resolveFieldValue(field, bean, beanName); } if (value != null ) { ReflectionUtils.makeAccessible(field); field.set(bean, value); } }
调用bean的初始化方法 populateBean()执行完毕后就会调用initializeBean()方法来调用bean的初始化方法(XML或@Bean注解配置的initMethod,或Bean实现的InitializingBean#afterPropertiesSet()方法)
1
2
3
4
5
6
7
8
9
10
11
12
13
14
15
16
17
18
19
20
21
22
23
24
25
26
27
28
29
30
31
32
33
34
35
36
37
38
39
40
41
42
protected Object initializeBean (String beanName, Object bean, @Nullable RootBeanDefinition mbd) { invokeAwareMethods(beanName, bean); Object wrappedBean = bean; if (mbd == null || !mbd.isSynthetic()) { wrappedBean = applyBeanPostProcessorsBeforeInitialization(wrappedBean, beanName); } try { invokeInitMethods(beanName, wrappedBean, mbd); } catch (Throwable ex) { throw new BeanCreationException ( (mbd != null ? mbd.getResourceDescription() : null ), beanName, ex.getMessage(), ex); } if (mbd == null || !mbd.isSynthetic()) { wrappedBean = applyBeanPostProcessorsAfterInitialization(wrappedBean, beanName); } return wrappedBean; } private void invokeAwareMethods (String beanName, Object bean) { if (bean instanceof Aware) { if (bean instanceof BeanNameAware beanNameAware) { beanNameAware.setBeanName(beanName); } if (bean instanceof BeanClassLoaderAware beanClassLoaderAware) { ClassLoader bcl = getBeanClassLoader(); if (bcl != null ) { beanClassLoaderAware.setBeanClassLoader(bcl); } } if (bean instanceof BeanFactoryAware beanFactoryAware) { beanFactoryAware.setBeanFactory(AbstractAutowireCapableBeanFactory.this ); } } }
启动部分的收尾工作 在完成刷新application context之后,Spring Boot会发布ApplicationStartedEvent和ApplicationReadyEvent事件,调用各个Runner,然后应用正式启动开始运行
参考文章
spring boot 启动流程分析 spring boot 中的spring factories 机制 应用启动过程——准备应用上下文 应用启动过程——BootstrapContext SpringApplication中文文档 Spring Boot应用Main函数入口 Primary Source Spring源码分析之ConversionService Spring ConversionService 类型转换(一)Converter 走心Springboot源码解析: 三、prepareEnvironment()环境配置 解析配置文件信息